Structuring a .NET Core application – Part 3

Settings

Before you begin reading this article, please take your time and read part 1, Structuring a .NET Core application – Part 1: Separation of Concern and part 2, Structuring a .NET Core application – Part 2: Inversion of Control first.

The previous two parts demonstrated how to split your application into smaller parts, each with their own small task, e.g. Separation of Concern. You’ve also seen how to use dependency injection in different types of applications in a standardized way with as little code reuse as possible. With each library handling all the registration of its services and dependencies.

In this part, we will move a bit back from our libraries and into the application side. In this part, we’re going to look into settings and how to use them.

You can find the source code for this article here: https://github.com/nickfrederiksen/net-core-structure/tree/part-3-settings

We have 3 libraries, used by four different applications. Each of our three libraries has services that requires some form of configuration.

The DAL library needs a connection string. The Azure Storage library needs some keys to access an Azure Storage account. And the email library needs some information about the SMTP server, the sender, CC, BCC and so on. To configure that, is quite easy. Just put all the configurations into a config file, load it up and we’re good to go. But is that really the best way to do that?

We have 4 different applications, each of these has different ways to handle configuration:

  • ASP.NET Core uses appsettings.json and environment variables.
  • Azure Functions uses environment variables
  • The console app uses command line arguments.
  • The UWP app doesn’t seem to have anything buildin, but we will have our settings stored in a settings.ini file, just for fun.

In .NET Core, you can mix and match all you want, and we can get appsettings.json functionality in all of our application types. However, each application type has its own usages.

The ASP.NET Core application is usually run on a web server of sorts, where config files can help setup multiple instances of the same application with the same settings.

The Azure Functions is running in a “serverless”, (read: hosted), Azure environment, where you might want to have your configurations managed by Azure, since we don’t really know, or care about, where the code is running. So, here we’ll use environment variables instead of a config file.

A CLI application could use a config file, but since it’s a console line interface application, I might want to have the settings be set as arguments instead of a file. This way we can easily batch different jobs, with different configurations and execute from the same folder.

And our UWP is a piece of end-user software. We cannot expect the end user to know how to modify a json/xml/text config file, set/change environment variables or load up some proprietary database file just to change the sender email address. In this case, we might want to build a “settings”-page within the application.

If we had to add logic, within all our libraries to handle each of these scenarios. Our code would be massively cluttered and full of duplicate code. So instead, we need to let our application do the configuration of our libraries instead.

But first, we need to modify our libraries so that they can be configured:

Please note, much of what I describe in this part is described in detail here: https://docs.microsoft.com/en-us/aspnet/core/fundamentals/configuration/options?view=aspnetcore-3.1

Configuring the services

To get started, we need to add a single nuget package to our libraries:

  • Microsoft.Extensions.Options.ConfigurationExtensions

This package will add an extension method to the IServiceCollection that looks like this: “Configure<TOptions>(Action<TOptions> configureOptions)”

You might know this method from ASP.NET Core, as it comes as part of that.

What it does is quite simple: First, it creates an instance of TOptions, then it calls the configureOptions action delegate to populate the options instance. Then it adds it to our DI using 3 different interfaces:

  • IOptions<TOptions>
  • IOptionsMonitor<TOptions>
  • IOptionsSnapshot<TOptions>

I won’t go into detail about these interfaces here but take a look at the link above. It describes it quite well.

So, we will configure our options using the Configure extension method and the we can inject, using DI, those options into our different services as needed.

First, we’ll need to create our options class. I usually create a folder called “Options” where I put my options classes. I will only show one example here but check out the code on github to see all of them.

public class AzureStorageOptions  
{  
    public string ConnectionString { get; set; }  
}

This example is for the Azure Storage project. And, as you can see, an options class is not very complex.

We will then register that option, using the Configure method from above:

services.Configure<AzureStorageOptions>((options) => options.ConnectionString = "connection string");  

See, simple. But wait. We have still not configured anything. Just hardcoded the connection string directly into our code. And further, we aren’t using the options anywhere.

That shit won’t fly!

Negan, A-hole extraordinaire – The Walking Dead

So, first of we need to move the configuration out of our library. To do that, I will just add the configureOptions task delegate to the, in this case, AddStorage method. And it will look like this:

public static void AddStorage(this IServiceCollection services, Action<AzureStorageOptions> configureStorage)  
{  
    services.Configure(configureStorage);  
  
    ... omitted ...  
  
}  

And thus, the configuration is no longer our concern. Excellent! Now we need to get rid of this abomination:

services.AddSingleton(provider => CloudStorageAccount.Parse("connection string"));  

We need to use the connection string from our options, and not this hardcoded value. And that is actually quite simple:

services.AddSingleton(provider =>  
{  
    var options = provider.GetRequiredService<IOptionsMonitor<AzureStorageOptions>>();  
  
    return CloudStorageAccount.Parse(options.CurrentValue.ConnectionString);  
});  

This code gets the options from the. And since we cannot run the application without it, it is fair to use “GetRequiredService”. We then use the current value of the options instance to get our connection string and pass it into the Parse method. Simple.

But there’s more. We have a QueueService, that has a hardcoded value as well. We have to move that out into our configuration logic as well.

So first up, we need to extend the options class:

public class AzureStorageOptions  
{  
    public string ConnectionString { get; set; }  
  
    public string QueueName { get; set; }  
}  

And currently, the QueueService looks like this:

public class QueueService : QueueClient<QueueModel>, IQueueService, IQueueClient<QueueModel>  
{  
    public QueueService(CloudQueueClient cloudQueueClient)  
        : base(cloudQueueClient, "queue-name")  
  
    {  
    }  
}  

We need to remove the hard coded “queue-name” and use the QueueName property from the configured options. And that is quite simple:

public class QueueService : QueueClient<QueueModel>, IQueueService, IQueueClient<QueueModel>  
{  
    public QueueService(CloudQueueClient cloudQueueClient, IOptionsSnapshot<AzureStorageOptions> options)  
        : base(cloudQueueClient, options.Value.QueueName)  
  
    {  
    }  
}  

As you can see, we just inject the options as an IOptionsSnapshot instance and use the value from there. And the wonderful part here is, that you can inject the options anywhere in your code. Not just within your library. But also, in the user interface or logging, not that you should log the connection string, but you could log or display the queue name in the UWP app and ignore the value in the ASP.NET application. It’s up to you. All that matters is that our library and its services has been configured.

Configuring the applications

All we need to do now, is to configure the applications themselves. And it’s also quite simple.

ASP.NET Core

Most of the ASP.NET Core configuration can be automated using the Bind() extension method on the IConfiguration interface. The extension method is located in this namespace: Microsoft.Extensions.Configuration.

All you need to do is update your call to the AddStorage method into this:

services.AddStorage(options => this.Configuration.Bind("azureStorage", options)); 

The Bind method, reads a section in the appsettings.json file called “azureStorage” and maps the values onto the passed in options instance.

Our appsettings.json then looks something like this:

"azureStorage": {  
    "ConnectionString": "connection string",  
    "QueueName": "queue-name"  
}  

As you can see, the json properties maps directly to the properties of our options class.

You might want to move the connection string into the “ConnectionStrings” section. That can also be done, quite easily: Please note: Do not have connection strings that points to your live database in your version control. That’s an easy way to get in the news.

By using the connection string section in the appsettings.json, we can configure our Azure App Services with connection strings more easily.

First, update the appsettings.json:

"ConnectionStrings": {  
    "azureStorage": "connection string",  
},  
"azureStorage": {  
    "QueueName": "queue-name"  
}

We also need to update our configuration code:

services.AddStorage(  
    options =>  
    {  
        this.Configuration.Bind("azureStorage", options);  
        options.ConnectionString = this.Configuration.GetConnectionString("azureStorage");  
    });  

First, we bind the settings from the “azureSettings” section, then we set the connection string from the connection strings section. That’s it really.

Azure Functions

Azure functions are a bit different in the way it handles settings. It uses environment variables instead of configuration files. However, in a local dev environment, it does have a configuration file: local.settings.json. And it might look something like this:

{  
    "IsEncrypted": false,  
    "Values": {  
        "AzureWebJobsStorage": "UseDevelopmentStorage=true"  
    }  
}  

Nothing radical. All we have to look at, is the Values section. This is a simple key-value object. Nothing special. So, we add the configurations for the Azure storage example at it looks like this:

{  
    "IsEncrypted": false,  
    "Values": {  
        "AzureWebJobsStorage": "UseDevelopmentStorage=true",  
        "azureStorage-ConnectionString": "connection string",  
        "azureStorage-QueueName": "queue-name"  
    }  
}  

To use those values in our application, all we need to do, is to read the environment variables:

services.AddStorage(  
    options =>  
    {  
        options.ConnectionString = Environment.GetEnvironmentVariable("azureStorage-ConnectionString");  
        options.QueueName = Environment.GetEnvironmentVariable("azureStorage-QueueName");  
    });  

There you have it. And note that we don’t have to create an instance of the “AzureStorageOptions” class. It has already been instantiated.

You can read more about it here: https://docs.microsoft.com/en-us/azure/azure-functions/functions-run-local?tabs=windows%2Ccsharp%2Cbash

Console applications

In our console application, in this example at least, we don’t want any configuration files. We want all our configurations to come from the argument list.

First up, we need to parse the argument list. This code is not pretty, but bear with me:

private static IReadOnlyDictionary<string,string> ParseArgs(string[] args)  
{  
    var values = new Dictionary<string, string>();  
  
    for (int i = 0; i < args.Length - 1; i++)  
    {  
        var key = args[i];  
        var value = args[i + 1];  
        if (key.StartsWith('-'))  
        {  
            key = key.Substring(1);  
            values.Add(key, value);  
        }  
    }  
  
    return values;  
}  

We then need to pass those values into the configuration code:

static async Task Main(string[] args)  
{  
    var configurations = ParseArgs(args);  
  
    var builder = Host.CreateDefaultBuilder(args);  
    builder.ConfigureServices((hostContext, services) =>  
    {  
        services.AddStorage(  
            options =>  
            {  
                options.ConnectionString = configurations["azureStorageConnectionString"];  
                options.ConnectionString = configurations["azureStorageQueueName"];  
            });  
    });  
  
    await builder.RunConsoleAsync();  
}  

Then, we can call the application like this:

IoCTest.Applications.CLI.exe -azureStorageConnectionString “connectionstring” -azureStorageQueueName “queuename”.

Universal Windows Application

As the previous examples show, we can store and retrieve our application configurations differently. But our services stay the same. The same goes for UWP applications.

But, instead of relying on environment variables, setting up appsettings.json or adding command line arguments. I will demonstrate how to read configurations from an ini file and use the values in our services.

First up: The config.ini file.

Create a file called config.ini. It is important, that this file is always being copied to the output directory:

Visual Studio file properties for the config.ini file with the “Copy to Output Directory” property set to “Copy always”

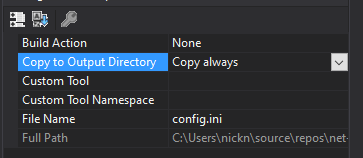
Otherwise the application cannot find the file.

Next up, add our values:

azureStorage-ConnectionString=connection string  
azureStorage-QueueName=queue-name  

Then, in the App.Services.cs file, we will load and parse the file: (I know, this logic should be put elsewhere, “Separation of concern” and all that. But for this example, I’m keeping it simple.)

private IReadOnlyDictionary<string, string> LoadSettings()  
{  
    var lines = File.ReadAllLines("./config.ini");  
    var values = lines.Select(l => l.Split("=")).ToDictionary(k => k[0], v => v[1]);  
  
    return values;  
}  

And then, set the values:

private void ConfigureServices(IServiceCollection services)  
{  
    var settings = this.LoadSettings();  
    services.AddStorage(  
        options =>  
        {  
            options.ConnectionString = settings["azureStorage-ConnectionString"];  
            options.QueueName = settings["azureStorage-QueueName"];  
        });  
}  

And that’s it. Four applications, four different types of managing configurations, 3 services all configured the same way.

TL;DR

Application settings, as the name implies, are application specific. You may have services shared across different application types. But the way each application handles configurations may differ from one another.

So, instead of letting the libraries do all the configurations and letting the guess what kind of application we’re running. We will let the application do the configuration for us, and then pass those down into our services in a standardized way.

Read more

If you haven’t already, please take a look at the other posts in this series:

Structuring a .NET Core application – Part 1: Separation of Concern

Structuring a .NET Core application – Part 2: Inversion of Control

Structuring a .NET Core application – Part 2

Inversion of Control

Before you begin reading this article, please take your time and read part 1 first: Structuring a .NET Core application – Part 1: Separation of Concern.

When building a service that has a dependency to a second, third or even fourth service. A sensible decision would be to just create new instances of those dependencies as you need them. It makes sense. I need a price calculation service therefore I create one and use it.

It makes sense to do so. Only create what you need when you need it. But what will happen if you need the price calculation service multiple places. You will end up creating multiple instances of the same service, and that could impact performance in a bad way. One way of handling this, is to add the dependent service as a parameter to the constructor and let someone else handle the creation of the dependent service. That is called Inversion of Control or IoC.

This post is not about IoC. But about how we can use that to our benefit by moving the creation and disposal of services away from our services into an IoC container. Luckily for us, such a container is baked into ASP.NET Core.

I will in this post show how to easily use IoC and register multiple services at once and use the same registration method in different .NET Core application types. From ASP.NET and Azure Functions to Console and Universal Windows applications. And yes, it is possible and quite powerful.

The Visual Studio Solution

To illustrate what we’re doing, I’ll have a solution with 7 projects:

  1. IoCTest.Web.Rest (ASP.NET)
  2. IoCTest.AzureFunctions.EmailService (Azure function)
  3. IoCTest.Applications.CLI (console app)
  4. IoCTest.Applications.Windows (uwp app)
  5. IoCTest.Integrations.Email (.NET Standard library)
  6. IocTest.Infrastructure.DAL (.NET standard library)
  7. IoCTest.Integrations.AzureStorage (.NET Standard library)

It might seem like a lot, but you’ll see, once you’ve done it once, you’ll be able to do them all. In an extraordinary short time. The solution here, took me about an hour and a half to setup. Yes, it has no business logic, but it does have a lot of moving parts. 1 hour 30 minutes from zero to 7 projects all referenced, IoC initialized, setup and ready to go.

The source code for this post can be found on GitHub right here:

https://github.com/nickfrederiksen/net-core-structure/tree/part-2-inversion-of-control

With ASP.NET Core came a build-in inversion of control container wrapped in a service called WebHostBuilder. This was meant for ASP.NET and ASP.NET only. But with .NET Core 3, came the new GenericHostBuilder. With this update came the ability to take many of the features available to ASP.NET and use them in new application types. It even makes it possible to mix and match. Hosting a rest api in a console app. Having console features in a web app, even Windows services. But that is out of scope for this series. For now, we will focus on one thing: Inversion of Control.

Just a side note: You can get the pattern I present her to work from a .NET Framework application using a DI like Ninject, Castle Windsor or LightInject. It’s a bit more cumbersome, and I won’t get into that since .NET Framework has a foot in its grave already.

Registering the services

Using the build-in service locator we need to register the services. That is done using the IServiceCollection interface from the host builder.

In an ASP.NET Core application, this is done in the Startup.cs class in the method “RegisterServices”. And it looks a lot like this:

ASP.NET Core, (Startup.cs):

private void RegisterServices(IServiceCollection services)  
{  
    services.AddScoped<IEmailClient, EmailClient>();  
}

Azure Function, (Startup.cs):

public override void Configure(IFunctionsHostBuilder builder)  
{  
    builder.Services.AddSingleton<IEmailClient, EmailClient>();  
}

Console application, (Program.cs)

builder.ConfigureServices((hostContext, services) =>  
{  
    services.AddSingleton<IEmailClient, EmailClient>();  
});  

Universal Windows Application, (App.xaml.cs)

IServiceCollection services = new ServiceCollection();  
  
services.AddScoped<IEmailClient, EmailClient>();  

As I wrote earlier, the inversion of control container is native to ASP.NET Core but we can make use of it in difference application types as well. I will demonstrate that later on.

This way of registering services is easy. Each application registers the services it needs and we are all happy. Or are we? If we look at the EmailClient, we can see it has two dependencies:

public EmailClient(  
    IEmailBodyGenerator bodyGenerator,  
    SmtpClient smtpClient)  
{  
    this.bodyGenerator = bodyGenerator;  
    this.smtpClient = smtpClient;  
}  

This means, that each application must register each of those services as well. And when the dependencies change, and it will in part 3 of this series, we will have to update each application and essentially copy and pasting code, creating duplicate code and that is bad. See part 1 on that.

What if we could make our email library do the work for us? The library ought to know about all its services and their dependencies? I think that’s a fair assumption.

When I build libraries like this, I like to make a Configurator class. What this class does is actually the same as you would in the above examples.

All you need to do is install the following NuGet package:

  • Microsoft.Extensions.DependencyInjection.Abstractions

However, if your library has a nuget package installed, that already has this dependency. You don’t need to install this one. That is the case with the DAL library, where the Entity Framework Core package has a dependency on this package already.

The configurator class has a static method, an extension method for IServiceCollection, and looks a bit like this.

public static void AddEmailServices(this IServiceCollection services)  
{  
    services.AddScoped<IEmailClient, EmailClient>();  
    services.AddScoped<SmtpClient>();  
    services.AddScoped<IEmailBodyGenerator, HtmlGenerator>();  
}

Note the naming. The method is named after what it does. This one adds all the services needed by the email library. If your library has multiple, independent services, you could add more of these extension methods. That’s up to you.

Now all we have to do in our startup.cs and their equivalents are this:

services.AddEmailServices();

And voilà, now the email services can evolve by themselves, all without breaking your applications or forcing you to update all the registrations.

I have come across multiple solutions where this is the case, been involved in quite a few of them myself before learning this “trick”. Which is why I choose to write about it here.

I know that it creates a dependency on a NuGet package on all our libraries, but I find the trade-off worth the while. Since we have separated the concerns into separate libraries, each with their own setup method, we have less duplicated code and decreased complexity. And we can reuse the same setup logic across several types of applications as well.

Feel free to go through the repo above to get into details on how I’ve implemented this.

Please bear in mind, that this is only for demonstration, not for production. The code builds and runs, but it needs a lot of configuration which I’ll dig into in the next part, and still has no business logic.

For now, let’s wire up the inversion of control containers for each of our applications:

Setting up Inversion of Control

As you know by now, ASP.NET Core already comes with an IoC container baked in so I won’t get into details on that. But I will take you through the other application types.

Console application

If you open up the IoCTest.Web.Rest project, you’ll see a Program.cs file. At first glance, it might seem odd that a web application needs a Program class just like a Console application. The reason is that an ASP.NET Core application, first and foremost, is a console app.

If you open the bin folder, you’ll see that is has created two files: IoCTest.Web.Rest.dll and IoCTest.Web.Rest.exe. The dll contains the code that we need to actually run the application. The exe file is the self-hosted application. A portable webserver that serves your application, just like IIS would do. If you run the .exe file, you’ll see something like this:

Example of an ASP.NET Core application running as a console application.

You can now go to http://localhost:5000 or https://localhost:5001. All this without setting up a local IIS or starting up an IIS Express instance.

This, to me, demonstrates perfectly, that an ASP.NET Core application is just a simple console application, with some services loaded and executed. And that opens for a whole lot of awesome.

If you think about it. If you can load up a web server from a console app. What kind of other stuff can you load up as well?

So, let’s look at our IoCTest.Applications.CLI project.

It has two files: HostedConsoleService, which we’ll look at later, and a Program file, pretty standard for a console application.

If you look at the Program.cs file from both the ASP.NET application and the console application side by side, you’ll notice a couple of things:

  1. They both call Microsoft.Extensions.Hosting.Host.CreateDefaultBuilder(args)
  2. They both configure services, (the web app through the startup class)
  3. And they both call a Run method.

When you create a new .NET Core console app, you will not have access to the host builder. You will, in fact, have access only to a bare minimum of services for a .NET Core application. We need to install two NuGet packages to get that:

  • Microsoft.Extensions.Hosting
  • Microsoft.Extensions.Hosting.Abstractions

This will give us access to the generic host builder and the IHostedService interface, which I will dig into later.

All we need to do is to change our Main method a bit:

static async Task Main(string[] args)  
{  
    var builder = Host.CreateDefaultBuilder(args);  
    builder.ConfigureServices((hostContext, services) =>  
    {  
        services.AddSingleton<IHostedService, HostedConsoleService>();  
                  
        // TODO: Register services  
    });  
  
    await builder.RunConsoleAsync();  
}  

You’ll notice that I’ve change the signature a bit. With .NET Core 2.0 we finally got support for native async console applications. Which we need since our application host is going to run asynchronously.

The second thing you’ll see, is that I call Host.CreateDefaultBuilder(), exactly as I do in the ASP.NET Core application.

It then deviates a bit.

Instead of ConfigureWebHostDefaults, we call ConfigureServices. And instead of calling .Build().Run(), we call RunConsoleAsync().

The ConfigureServices method is our stand-in for the startup class. This is where we’ll register all our services. Including, the most important one: The IHostedService implementation HostedConsoleService.

Let’s dig into that one.

internal class HostedConsoleService : IHostedService  
{  
    public Task StartAsync(CancellationToken cancellationToken)  
    {  
        return Task.CompletedTask;  
    }  
  
    public Task StopAsync(CancellationToken cancellationToken)  
    {  
        return Task.CompletedTask;  
    }  
}  

Nothing. Absolutely nothing. But it’s still very important.

In a normal console application, the Main method is our entry point. This is where we instantiate and run everything. But not in this case. In this case, we register our services and starts a generic host from our Main method. But our host is no good host if it has no services to host. Hence the IHostedService. This class is now our entry point. We can create a constructor and add all the services we need like this:

private readonly IEmailClient emailClient;  
  
public HostedConsoleService(IEmailClient emailClient)  
{  
    this.emailClient = emailClient;  
} 

And then we can use the IEmailClient service. Of course, we need to register it first, but you get the gist.

A note: Normally a console app closes automatically after completion. Not in this case. We need to tell our application to stop. To do so, just inject the Microsoft.Extensions.Hosting.IHost interface and call the host.StopAsync() method when you need to stop the application. Otherwise it keeps running until ctrl+c is pressed, or the console is closed.

A second note: In a web context, a scoped service is created once in the beginning of a request and reused until the request ends. In console applications and UWP applications, you need to manage the scopes yourself. I will not dive into this here, as it is out of scope for this series.

Azure Functions

From the very beginning, Azure Functions was build almost the same way as basic console applications: A static class with a static method with your code. It’s all good for small tasks. But if you have a set of methods doing different tasks on the same libraries it quickly gets complicated when you have to initialize every single service one by one, for every dependent service as well. And doing it for multiple Azure Functions. There was some rudimentary dependency injection, but only for a few known services and definitely not for custom services.

This has changed with .NET Core 3 and the Azure Functions v3 API. Now we can have a startup.cs and use the approach described earlier on.

All we need is two NuGet packages:

  • Microsoft.Azure.Functions.Extensions
  • Microsoft.Extensions.DependencyInjection

The latter, I find, is self-explanatory. The former, is what makes magic possible. It exposes an abstract class called, Microsoft.Azure.Functions.Extensions.DependencyInjection.FunctionsStartup.

All we have to do now, is to create a new class, Startup.cs, inherit from this class and implement the Configure method.

Oh, and one thing: We need to tell the runtime that we have a startup class, otherwise it won’t use it. To do that, we need to add this to our class file:

[assembly: FunctionsStartup(typeof(IoCTest.AzureFunctions.EmailService.Startup))]  
namespace IoCTest.AzureFunctions.EmailService  

The FunctionsStartupAttribute is found in the namespace Microsoft.Azure.Functions.Extensions.DependencyInjection.

It is important, that this line of code is located outside of the namespace as it contains information that is needed by the runtime during assembly load.

All it does, is telling the runtime to create an instance of the class registered and start the application from here.

The Configure method, gives us access to an instance of IFunctionsHostBuilder. At the moment, it doesn’t contain much, but it do contain a single property: Microsoft.Extensions.DependencyInjection.IServiceCollection Services { get; }.

And you will notice, that the IServiceCollection matches the one we have been using to register all our services. So now, we can do something like this:

public override void Configure(IFunctionsHostBuilder builder)  
{  
    var services = builder.Services;  

    services.AddEmailServices();  
    services.AddDatabaseAccess();  
    services.AddStorage();  
} 

Brilliant! But how can we inject these fine services into our static Function class. Easy: First remove the “abstract” keyword from the class and method definition. Add a constructor that takes the services you want to use, and the use them in your function:

public class Function1  
{  
    private readonly IEmailClient emailClient;  
  
    public Function1(IEmailClient emailClient)  
    {  
        this.emailClient = emailClient;  
    }  
  
    [FunctionName("Function1")]  
    public Task Run([TimerTrigger("0 */5 * * * *", RunOnStartup = true)]TimerInfo myTimer, ILogger log)  
    {  
        return emailClient.SendEmailAsync("[email protected]", "[email protected]", "Sent from a Azure Function using IoC", new { text = "This is so awesome!" });  
    }  
}  

Simple as that.

As you can see, three different application types, all using the same service registration logic. And now for something a bit more complicated:

Universal Windows Application

I have little to none experience with Universal Windows Applications, or UWP Apps. I did a bit of WPF development back in the day, but it has definitely been a long time since.

This example is merely to demonstrate how to use the same methodology as above, but in a completely different environment. UWP apps are not console applications. They work in a completely different way compared to web applications and are not service based as Azure Functions. I will not dig into scope management as I’m too unfamiliar with the API’s to do so. But I will show how you could build inversion of control into you UWP app and reuse the same services as your other applications. Without any hazzle, well maybe a little, let’s see:

First you need to install three NuGet packages:

  • Microsoft.Extensions.DependencyInjection
  • Autofac
  • Autofac.Extensions.DependencyInjection

Since UWP’s, as of writing, does not have inversion of control natively, we need to use an external IoC container. In this case, Autofac. And you’ll see why, later.

As you might have noticed, I like to separate things into separate parts by concern. The same goes for this next part.

Any application has an entry point. UWP apps has one called App.xaml and a corresponding App.xaml.cs. We want to extend this a bit. So, first things first: Create a new file called App.Services.cs. In this file, you should create a single partial class called “App”:

public partial class App  
{  
  
}

In here we’ll add a public static property that contains the IoC container and a method called ConfigureServices().

In here, we’ll setup Autofac and register our services:

public partial class App  
{  
    public static IContainer ServiceContainer { get; private set; }  
    private void ConfigureServices()  
    {  
        var containerBuilder = new ContainerBuilder();  
        IServiceCollection services = new ServiceCollection();  
  
        services.AddScoped<IEmailClient, EmailClient>();  
  
        this.ConfigureServices(services);  
  
        containerBuilder.Populate(services);  
  
        ServiceContainer = containerBuilder.Build();  
    }  
    private void ConfigureServices(IServiceCollection services)  
    {  
        services.AddEmailServices();  
        services.AddDatabaseAccess();  
        services.AddStorage();  
    }  
}  

That’s it really. Remember to include these namespaces: Autofac, Autofac.Extensions.DependencyInjection and Microsoft.Extensions.DependencyInjection.

Now we only need to call our “ConfigureServices” method from the App class and we are golden. For this example, I do it from the constructor. You might want to do it somewhere else to better manage resources when going back and forth between pages and the suspended state. You might know this a lot better than I.

To get one of your services, all you have to do is call the Resolve<> method on the App.ServiceContainer property:

public sealed partial class MainPage : Page  
{    
    public MainPage()  
    {  
        var emailClient = App.ServiceContainer.Resolve<IEmailClient>();  
  
        this.InitializeComponent();  
    }  
} 

You’ll notice that we don’t have dependencies in the constructor. At the time of writing, it is very complicated to get that working, so this method will do for now.

You can read more about Autofac and how to register and resolve services here:

https://autofaccn.readthedocs.io/en/latest/resolve

In the next part, I will dig into how to use all of this for configuration. Allowing the same services to be configured from completely different configuration sources. It is almost scary how easy and reusable it is.

TL;DR

It is very easy to build a large number of small services and reuse these services across different kinds of .NET Core applications. By using IoC intelligently.

It is also easy to maintain all these small services, registering them, updating, adding and removing them. Without breaking all your applications with one standardized method.

It might take a bit of configuration for some of the application types, but it is all “set and forget”. Have you done it once, you will never have to think about it ever again.

Read more

If you haven’t already, please take a look at the other posts in this series:

Structuring a .NET Core application – Part 1: Separation of Concern