This post is more of an architectural walk through of the ideas rather than a complete running application.
Even though I do not mention Azure Functions, I highly recommend using them when working with queues and Service Bus. You can do without, but doing so is more difficult.
Setup
Many systems have some sort of pipeline, a series of tasks running after each other, to accomplish a goal. That could be completing a purchase, importing products, or migrating a database.
Each of these pipelines consists of several tasks.
If we look at the “import product” pipeline, we might only have one task, “import product”, but we will execute that task thousands of times before all products has been imported. We might consider an “import product” pipeline, to be one large collection of tasks:
- Import product 1
- Import product 2
- Import product 3
- …
- Import product 4567
This just looks like an ordinary queue, add a bunch of tasks, execute one by one.
If one execution fails, say the product is missing information, the rest of the products should still be imported. A queue does not really care about the whole, only each message.
If we, then, look at a pipeline for completing a purchase, we might have more tasks. These could look similar to these:
- Generate order number
- Calculate total payment
- Process payment
- Generate order receipt (PDF)
- Send email with the receipt
Each of these tasks must be executed in that exact order, we cannot process payment before having calculated the total costs. Sending an email before having a receipt would not make sense and all the tasks need an order number. We must also handle situations where any of the tasks might fail. And if so, none of the remaining tasks must be executed. It would be bad to send a receipt to the customer if the payment has not gone through.
Again, this is just a queue, executing messages one at a time. However, this is a First-In-First-Out queue. The first item on the queue, is the first one to be executed. Then the next, and so on.
When importing products, say by uploading an excel spread sheet, we add each row (product) to the queue. This we will call a job: Upload excel sheet, loop through each row, add row to the queue. When we upload a second spreadsheet, we will create a second job to not interfere with the first job. In fact, we will create a second queue. So, one queue per job, each job has a set of tasks. The same goes for the purchase pipeline. Each order completion creates a new job with a list of tasks to execute.
Azure Service Bus
In a “normal” or traditional approach, we would make a simple loop that loops through each of our tasks and executes them one at a time. It is simple and it works:
// Import products:
foreach (var product in listOfProducts)
{
	importProduct(product);
}

// Complete purchase
foreach (var task in listOfTasks)
{
	task.Execute(order);
}
Nothing too fancy here. However, we have no idea how long it will take to execute all the tasks. If it takes a second, no problem. If it takes minutes, then the user might experience timeouts or think something went wrong.
Another issue here, is also error handling. How do we handle errors? Well, we could wrap each task in a try-catch. Or we could wrap the entire loop in a try-catch. Doing the former, we would be able to try that task again, if it keeps failing, we could stop the loop, or continue with the next task. The latter would break out of the loop, always, with no way to retry the failing task.
Both still suffer from bad error-handling. Say, we call an external service that is down for maintenance. If we retry a task 5 times with a second in between, chances are we will not get a success. The task will fail. And if a task fails, how do we retry that task when the service is up again? Furthermore, if we have prevented the remaining tasks from executing, how do we execute those when the service is back online? How do we know how many and which tasks needs to be executed?
To do this, we need to offload our task execution and loops. There are many tools and services out there, but I will focus on Azure Service Bus.
Azure Service Bus is a First-In-First-Out queue. Messages, (tasks on a queue is called messages), are being executed in the order in which they have been added to the queue. Using Azure Storage Queues, messages are being handled more or less randomly.
If we look at the purchase example above, our what we want our queue to look like is something like this:
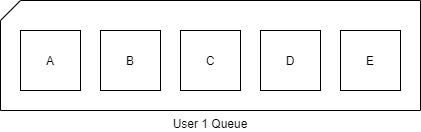
However, if two orders are getting completed simultaneously our queue might end up looking like this:

And that is bad. First, we do not know which task belongs to which context, or job, without adding a lot of meta data to our messages, and we cannot easily stop the execution for one task and the following tasks without interfering with other jobs.
Luckily for us, Service Bus also supports, what they call, “Sessions”. Sessions are a way to logically group several tasks by an id called SessionId, into separate queues.
So, two simultaneous jobs would look a little like this:
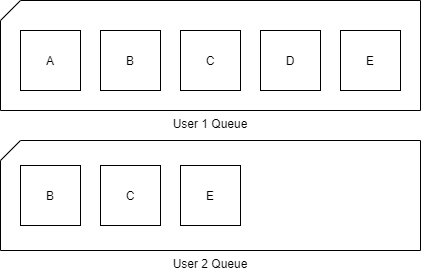
See, two queues, two contexts. If one fails, the other continues.
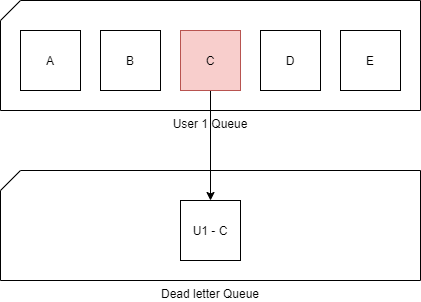
Service Bus can also handle errors. By default, if a task fails more than 10 times, it will be deemed undeliverable and sent to a so-called “dead letter queue”. In Storage Queues, these are called poison queues.
In the case of our product Import, if product number 572 fails 10 times, it will be sent to the dead-letter queue. And the next message is being handled:
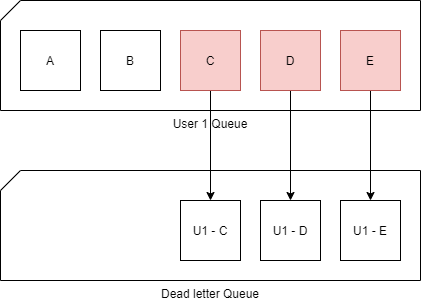
The same goes for the purchase pipeline. If the payment processing fails 10 or more times it will go into the dead-letter queue. However, it will not stop the execution of the remaining tasks. It will continue to the next one.
That works great on a product import where we do not want to cancel the remaining 4000 product imports just because one failed. But in a purchase completion pipeline, we must stop.
To do that, we can utilize something called “Session State”.
Session State
Now we are getting into something that is not very well documented.
Before I knew about the session state, I looked at the problem:
I have a task that has failed. I must move the task into the dead-letter queue and then move the remaining tasks into the dead-letter queue as well.
Problem is, we are dealing with queues. You are not meant to loop through messages on a queue and move them around. You need to wait until you receive a message and then process it.
So, I built something very elaborate, that would wait for 30 seconds and retrieve all messages and the move them into the dead-letter queue.
The problem with this approach became apparent fast. First off, I cannot be sure that all messages are available within 30 seconds. Second, reading from the queue the way I did, did not ensure correct order. And third, I fell straight into a session locking hell where the session was being locked and opened and re-locked at random making the application unstable.
So, after digging through the interwebs I found a blog post, https://www.codeguru.com/columns/experts/advanced-azure-queuing-with-the-sessions-and-the-service-bus.htm, that mentions Session State.
Digging further into Session State, I learned that the session state is always null, until you set it to something not-null. Once you set it, it is available to every task for that session, even for tasks that are added afterwards. This can be (mis)used.
I never found any real documentation on the use for the session state, and since it’s always null and I can set it to whatever I want, I chose to invent my own state object:
public class SessionState
{
	public bool IsFailedSession { get; set; }
}
I can then create a new instance, serialize into json and bytes, set the state. The next task can then see whether we are in a failed state or not.
The way I set the state is shown here:
public static class MessageSessionExtensions
{
	public static Task SetSessionStateAsync(this IMessageSession messageSession, SessionState state)
	{
		byte[] bytes = null;
		if (state != null)
		{
			var json = JsonConvert.SerializeObject(state);
			bytes = Encoding.UTF8.GetBytes(json);
		}

		return messageSession.SetStateAsync(bytes);
	}

	public static async Task<SessionState> GetSessionStateAsync(this IMessageSession messageSession)
	{
		byte[] bytes = await messageSession.GetStateAsync();

		SessionState state = null;
		if (bytes != null)
		{
			var json = Encoding.UTF8.GetString(bytes);
			state = JsonConvert.DeserializeObject<SessionState>(json);
		}

		return state;
	}
}
It is quite basic serialize to Json, get the bytes and call SetState. To get the state, is the same. But in reverse. Nothing fancy.
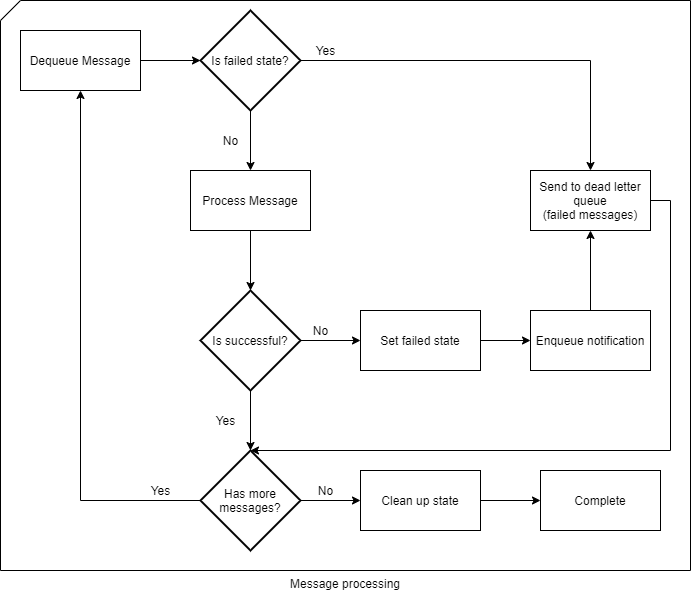
When executing a task, I will first get the session state. If IsFailedSession == true then send the message straight into the dead-letter queue, without executing it.
Word of caution though. The Session State takes up storage. Storage you are paying for. And session state is, from what I can tell, permanent. You will have to clean it up.
Previously, there was an API we could use to clean up the session state occasionally. However, in the new .NET Core / Standard libraries, this API is no longer present (https://github.com/Azure/azure-service-bus/issues/275).
To make sure we do not use storage we do not need, we must clear the state on the last message. What I have chosen to do, is add a property to my message indicating whether this is the last message or not.
When processing the message, I will then call SetState(null) when IsLastMessage == true. If and when the old API returns, I would make an Azure Function run once a day to clean up states.
This flow chart might explain better what I am trying to do:
You can read more about Session State here:
https://docs.microsoft.com/en-us/azure/service-bus-messaging/message-sessions#message-session-state
Error handling
At this point, we send failed messages to the dead-letter queue and prevents execution of the remaining tasks.
How do we handle those errors?
The dead-letter queue is a queue, so we cannot enumerate the list and get all related tasks and re-add them to the main queue. And since the dead-letter queue, does not support sessions, everything is mixed with each other.
Introducing Azure Table Storage. Table Storages has two main fields: Partition Key and Row key. The Partition Key identifies a partition, or a group of rows and the row key is the unique id of the row. The combination of partition key and row key must be unique.
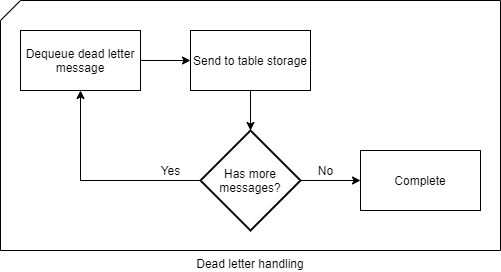
What that gives us, is the ability to logically group our messages. Say by Session id. This way, we can literally move messages from our dead-letter queue into a table storage 1-1. With our session id as our partition key and the unique message id, SequenceNumber, as our row key.
We can then add our message body as a separate field and just post it there, raw.
Another neat thing is, we can set a reason for why we have added a message to the dead-letter queue.
That message could be the exception that was thrown, or that it was sent to the dead-letter queue because of it being in a failed state from a previous task.
If we add that information to the table, we can even look all the errors up and handle the individually later.
The flow looks similar to this:
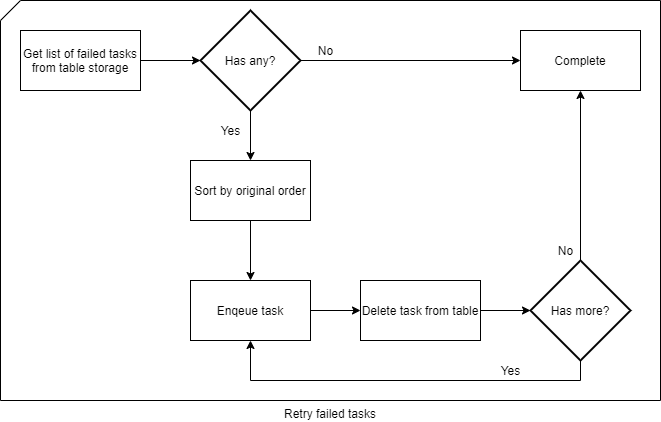
Say the “Generate PDF” from earlier had failed. A patch has been deployed and we want to execute everything that has failed on that task. Well, we would just search through our table for that specific message and then send all messages that shares the same partition key to the service bus. Ordered by the row key, the failed task, and the remaining tasks, will be executed in the exact same order as originally.
A side note: When sending / re-adding the messages to the Service Bus queue, make sure you do not re-use the session id. By doing so, you might end up mixing states. Re-adding messages to the queue, is a new job or a new session, therefore it requires a new session id.
If the job fails again, it will be added back to the table.
The complete retry flow will look like this:
Resources
Azure Service Bus: https://docs.microsoft.com/en-us/azure/service-bus-messaging/service-bus-messaging-overview
Azure Queue Storage: https://docs.microsoft.com/en-us/azure/storage/queues/storage-queues-introduction
Azure Function Triggers and Bindings: https://docs.microsoft.com/en-us/azure/azure-functions/functions-triggers-bindings