Database design on user defined properties

As a developer, I often get across some database designs, that are quite complex caused by a developer not quite understanding the problem (we’ve all been there!), and therefore cannot solve it correctly.

The problem is as follows (or similar):

You have 2+ tables:

No references

Initial tables – no references

It’s quite simple, you have two types of data (media and documents), that you want to store in your database. I get that, I would too.

Now the requirements are as follows:

Both media and document has a set of user defined properties.

Said properties must store the following values: Type and Value, and a reference to both Media and Document.

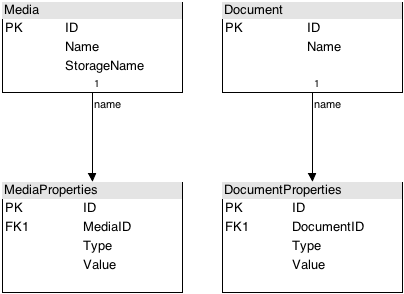
There are a couple of ways to solve this lil’ problem, one (the one I encounter the most):

References(1) - Database Inheritance

Property-table added and References are added to media and document.

In this setup the Property-table knows about both media and document. We could make the two foreign keys nullable, either way we depend heavily on our code to keep media and document properties separated. And what happens if we add an other type (say Users), then we have to add a new foreign key to the property-table, and expand our code even more.

An other approach is this:

<img class="size-full wp-image-762" alt="References(2) – Database Inheritance" src="https://ndesoft.dk/wp-content/uploads/2013/04/media_document_properties_take2 cialis overnight shipping.png” width=”404″ height=”444″ srcset=”https://ndesoft.dk/wp-content/uploads/2013/04/media_document_properties_take2.png 404w, https://ndesoft.dk/wp-content/uploads/2013/04/media_document_properties_take2-272×300.png 272w” sizes=”(max-width: 404px) 100vw, 404px” />

Media and document property references are stored in separate tables.

I must admit, I have done this one as well as the other one, and just admit it, so have you at some point!

So what are the pro’s and con’s of this setup: Well the pros are simple, neither media or document are referenced in the property table, we can have as many properties as we want per media and document, and we can quite simple add other types, such as Users. BUT:

When we have this setup, we must rely heavily on our code to help us not to have the same property on more than one media, and to ensure we don’t mix media properties with documents and users. And if we add an other type (Users) we must create, not only one, but two new tables, and still expand a complex code to handle that new type as well as the other types.

So how can we solve this problem?

We have Media, Documents and more types, that has dynamic  properties without the other types must know about it, we could do this:

References(3) – Database Inheritance

Each type now has its own set of properties

Yeah, I’ve also done this one. And this is almost, (I wrote, almost), as bad as the other ones. Well no property can be on more than one media (or document, or whatever), and no property can be on both media and document, so whats the problem?!

Well, for starters, we have to tables instead of one, per type. If we add an other field to our properties, we must add them to all of our *Property-tables. And if we want to list all properties, including the media/document/user/whatever it is attached to, it’s nearly impossible.

So here’s the solution, I find most fitting for the problem:

References, Inheritance – Database Inheritance

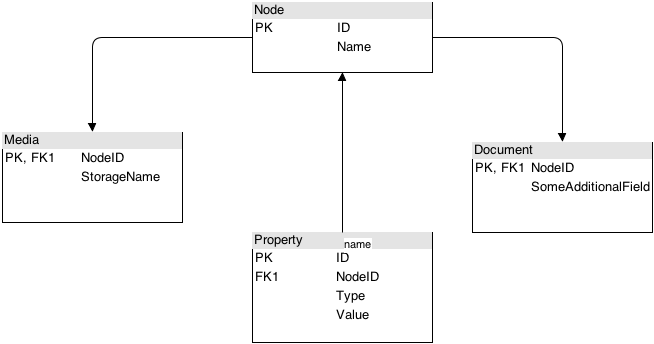
Added a Node-table, with the shared fields from Media and Document. Removed ID- and Name-fields from Media and Document, added a NodeID field, as both PK and FK. Added a Property-table, that references the Node-table.

So, this is my solution. I have added a Node-table, with the shared fields from Media and Document (ID and Name). Removed ID- and Name-fields from Media and Document, added a NodeID field, as both primary key and foreign key, this field must NOT be autoincremented! It will not work, then I added a Property-table, that references the Node-table.

The pros and cons: The pros are easy, One table per type, each type gets its ID from the Node-table, all properties are stored in one table, referencing the Node-table, so a Document can get its properties, using only its primary key. No property can ever be on two entities at once, and no entity knows about other entities or properties, except its own.

The cons are, that we must have some code that handles the inheritance. When I make a SELECT * FROM Media, I must make a JOIN on the Node-table as well. If you’re a .NET developer, like I, then you should take a look at the Entity Framework, as it handles this smoothly. I will write a post on that later on.

IEnumerable, why use it?

Okay, first off: I really love the IEnumerable<T> interface, and I use it excessively throughout my applications.

Almost any list or collection throughout the .NET framework implements this interface. It exposes only one method (GetEnumerator), but this method is your friend in almost any circumstance.

This method returns an Enumerator, which again exposes methods used to traverse (or loop through) the collection. This means you can make a method definition like this:

public void MyMethod(IEnumerable<string> someEnumerable)
{

}

I could call this method with any sort of collection, it could be string[], List<string>, IList<string>, IQueryable<string> or even a basic IEnumerable<string>. I don’t give a damn. I don’t care what the implementation is, I just want a collection to work with, nothin’ more.

This means I don’t need to force other developers who use my code, to pass an array or a List or some custom collection, they just pass whatever collection they have, and I will be able to work with it. That’s awesome!

But wait! How do you get an IEnumerable<T> in the first place? How can we make our own?

Well, in “ye olde times” one would make an abomination like this:

public List<string> MyMethod()
{
List<string> myResult = newList<string>();
for (int i = 0; i < dataSource.Length; i++)
{
// Do some work.
myResult.Add(dataSource[i].SomeProperty);
}
return myResult;
}

Can you see what’s wrong here?

There’s actually more than one thing that’s wrong with this snippet.

First off: When we return a specific implementation, in this case List<T>, we force our code to use this implementation. We kinda dictates the use of our result which is a major drawback on agile Development. What if the consumer don’t want or need a list?

Second: In line 3, we create an instance of an object we actually don’t need, so that we can return a list.

Third: We loop through a collection of an unknown size. This Collection could potentially contain a billion items.

Fourth: We have to wait until the loop has ended. Which could take forever. Think about what would happen to your app, when you loop though a billion items and only need the first five.

This is where .NET provides a concept of Enumerators. These are methods that only returns data when said data is ready to be returned on not when all data is ready to be returned. And it is actually the same method called from the GetEnumerator()-method.

To convert our method from above into an Enumerator, we must make some changes. First we need to return an IEnumerable<string> instead of a List. Second we need to remove the list-object. And finally rewrite the loop to use the keyword “yield”.

This is how our method would then look like:

public IEnumerable<string> MyMethod()
{
for (int i = 0; i < dataSource.Length; i++)
{
// Do some work.
yield return dataSource[i].SomeProperty;
}
yield break;
}

As you can see, the code looks way simpler. We don’t force our consumer to take a list. And the yield-keyword, changes the method into an Enumerator, which gives us a LOT of benefits:

The yield return, returns our data when the property Current is called on the Enumerator-instance. This property is usually called each time the MoveNext()-method is called. This Means you do not have to wait until all items are looped. You can stop at any moment. the yield-return is only called when you request the next item.

So if your consumer needs to loop through each of your items, you will only have to loop once, whereas the List-thingy above, would loop through the same items twice. That’s two billion items! Secondly the first example would always loop though each item, but the second one only loops through as many items as you want it to. Nothin more nothin less.


The essence of it all: Always use IEnumerable, only use lists where it cannot be done without it.

For performance reasons, always use Enumerators. They will save the day.


This is my first attempt on a “professional”-programming guide. Please provide feedback!

NMultiSelect – Et jQuery Plugin

NMultiSelect

UPDATE

This has become quite an old version, it’s good to get started, but to get the latest version, please take a look here: https://ndesoft.dk/category/web/js/nmultiselect-js/

Quick links

About NMultiSelect

Okay, I have been foolin’ around with javascripts again, i know, can’t help it. This time I have made me a jQuery plug-in. I chose jQuery because it’s so much easier to do cross browser compatible stuff with that framework, compared to time it will take for me to build it on my own.

The last 3/4 of a year, i have worked on and off with the Microsoft ASP.NET MVC framework, and found it quite likeable, in terms of development speed and possibilities in the markup and, in this case, JavaScript.

While working with the MVC framework, I have been looking for a nice, easy to implement method for a user to choose multiple values from a list. The good ol’ “hold ctrl while clicking”-method doesn’t quite do the job, so I decided to build my own control.

It’s, like most of the other stuff I’ve made, quite easy to use.

Seen from a user’s perspective, it’s simple, click or double click, select and click or what ever he or she feels like. For the developer, it’s also quite easy. A few lines of code, and you’re ready to go:


Getting started

First we need to include a few scripts:

<span class="kwrd">&lt;</span><span class="html">script</span> <span class="attr">type</span><span class="kwrd">="text/javascript"</span> <span class="attr">src</span><span class="kwrd">="https://ajax.googleapis.com/ajax/libs/jquery/1.5.1/jquery.min.js"</span><span class="kwrd">&gt;&lt;/</span><span class="html">script</span><span class="kwrd">&gt;</span>

<span class="kwrd"> </span><span class="kwrd">&lt;</span><span class="html">script</span> <span class="attr">type</span><span class="kwrd">="text/javascript"</span> <span class="attr">src</span><span class="kwrd">="http://code.jdempster.com/jQuery.DisableTextSelect/jquery.disable.text.select.pack.js"</span><span class="kwrd">&gt;&lt;/</span><span class="html">script</span><span class="kwrd">&gt;</span>

<span class="kwrd"> </span><span class="kwrd">&lt;</span><span class="html">script</span> <span class="attr">type</span><span class="kwrd">="text/javascript"</span> <span class="attr">src</span><span class="kwrd">="http://nmultiselect.ndesoft.dk/scripts/jquery.nmultiselect.min.js"</span><span class="kwrd">&gt;&lt;/</span><span class="html">script</span><span class="kwrd">&gt;</span>

Where you wan’t to place your box, you just put a div:

<span class="kwrd">&lt;</span><span class="html">div</span> <span class="attr">id</span><span class="kwrd">="EmptySelectContainer"</span><span class="kwrd">&gt;&lt;/</span><span class="html">div</span><span class="kwrd">&gt;</span>

We wan’t to remember this ID for later…

To transform the div, to a multi select box, we will have to write the following piece of code:

$(document).ready(
    <span class="kwrd">function</span> () {
        <span class="kwrd">var</span> m1 = $(<span class="str">"#EmptySelectContainer"</span>).NMultiSelect(<span class="str">"mySelection"</span>);
    }
);

What happens here is:

  1. $(document).ready – We will wait until the page is ready before doing anything.
  2. $(“#EmptySelectContainer”) – We select’s our div, using the ID from earlier. You can use any form of selectors here.
  3. NMultiSelect(“mySelection”) – Transform our div to a multi select box. The parameter (mySelection) is the name of the field getting posted to the server. In this case, we will be able to get our data using $_POST[“mySelection”] (using php, but more on that later.)

Now, we have transformed our div to a multi select box, but it’s a bit useless. Lets fill it with some values. To do so, use this function:

AddItemToList(value,text,selected).

The function AddItemToList, takes 3 parameters.

The first, is the value posted to the server. Usually an ID.

The second, is the text shown in the box.

The third, is a boolean value (not mandatory). If true, the item will be selected and visible in the right hand side box.

You can add as many items you want, Below is an example:

m1 = $(<span class="str">"#EmptySelectContainer"</span>).NMultiSelect(<span class="str">"mySelection"</span>);

m1.AddItemToList(<span class="str">"1-1"</span>,<span class="str">"Value 1"</span>,<span class="kwrd">false</span>);
m1.AddItemToList(<span class="str">"2-1"</span>,<span class="str">"Value 2"</span>,<span class="kwrd">false</span>);
m1.AddItemToList(<span class="str">"3-1"</span>,<span class="str">"Value 3"</span>,<span class="kwrd">true</span>);
m1.AddItemToList(<span class="str">"4-1"</span>,<span class="str">"Value 4"</span>,<span class="kwrd">true</span>);

Here we add 4 items to our box. Whereof the last two are pre-selected.

Now we have our items, it could be nice, to track how the user chooses, for statistics or calling AJAX methods or whatever. To do se, we can subscribe to the event:

SelectionChanged(code).

The parameter (code), is code that will be executed, when a user selects or deselects one or more items.

An example:

m1.SelectionChanged(<span class="kwrd">function</span>(data)
{
    <span class="rem">// Do stuff here.</span>
});

The function, or code, that is being executed, must take one parameter, (call it whatever you feel like, i would recommend “data”, because, that is what it is). This parameter contains two properties:

  • Items
    • Contains all elements we have added.
  • Selection
    • Contains all chosen elements.

The objects contained in the lists, has the following properties:

  • Text
  • Value
  • Selected

Full example

Bellow is a full example. You could also see nmultiselect live here.

<span class="kwrd">&lt;!</span><span class="html">DOCTYPE</span> <span class="attr">html</span> <span class="attr">PUBLIC</span> <span class="kwrd">"-//W3C//DTD XHTML 1.1//EN"</span> <span class="kwrd">"http://www.w3.org/TR/xhtml11/DTD/xhtml11.dtd"</span><span class="kwrd">&gt;</span>
<span class="kwrd">&lt;</span><span class="html">html</span> <span class="attr">xmlns</span><span class="kwrd">="http://www.w3.org/1999/xhtml"</span> <span class="attr">xml:lang</span><span class="kwrd">="da"</span><span class="kwrd">&gt;</span>
<span class="kwrd">&lt;</span><span class="html">head</span><span class="kwrd">&gt;</span>
    <span class="kwrd">&lt;</span><span class="html">title</span><span class="kwrd">&gt;</span>NMultiselect<span class="kwrd">&lt;/</span><span class="html">title</span><span class="kwrd">&gt;</span>
    <span class="kwrd">&lt;</span><span class="html">link</span> <span class="attr">rel</span><span class="kwrd">="stylesheet"</span> <span class="attr">type</span><span class="kwrd">="text/css"</span> <span class="attr">href</span><span class="kwrd">="/styles/style.css"</span><span class="kwrd">/&gt;</span>
    <span class="kwrd">&lt;</span><span class="html">script</span> <span class="attr">type</span><span class="kwrd">="text/javascript"</span> <span class="attr">src</span><span class="kwrd">="https://ajax.googleapis.com/ajax/libs/jquery/1.5.1/jquery.min.js"</span><span class="kwrd">&gt;&lt;/</span><span class="html">script</span><span class="kwrd">&gt;</span>
    &lt;script type=<span class="str">"text/javascript"</span> src=<span class="str">"/scripts/jquery.nmultiselect.min.js"</span>&gt;&lt;/script&gt;
    &lt;script&gt;
        <span class="kwrd">var</span> m1;
        <span class="kwrd">var</span> m2;

        $(document).ready(
            <span class="kwrd">function</span> () {
                m1 = $(<span class="str">"#EmptySelectContainer"</span>).NMultiSelect(<span class="str">"mySelection",<span class="kwrd">true</span></span>);

                m1.AddItemToList(<span class="str">"1-1"</span>,<span class="str">"Value 1"</span>,<span class="kwrd">false</span>);
                m1.AddItemToList(<span class="str">"2-1"</span>,<span class="str">"Value 2"</span>,<span class="kwrd">false</span>);
                m1.AddItemToList(<span class="str">"3-1"</span>,<span class="str">"Value 3"</span>,<span class="kwrd">true</span>);
                m1.AddItemToList(<span class="str">"4-1"</span>,<span class="str">"Value 4"</span>,<span class="kwrd">true</span>);

                m1.SelectionChanged(<span class="kwrd">function</span>(data)
                {
                    console.log(<span class="str">'List 1, selected values: '</span>+(data.Selection.length));
                });

                m2 = $(<span class="str">"#EmptySelectContainer2"</span>).NMultiSelect(<span class="str">"mySelection2"</span>);
                m2.AddItemToList(<span class="str">"1-2"</span>,<span class="str">"Value 1"</span>,<span class="kwrd">true</span>);
                m2.AddItemToList(<span class="str">"2-2"</span>,<span class="str">"Value 2"</span>,<span class="kwrd">false</span>);
                m2.AddItemToList(<span class="str">"3-2"</span>,<span class="str">"Value 3"</span>,<span class="kwrd">false</span>);
                m2.AddItemToList(<span class="str">"4-2"</span>,<span class="str">"Value 4"</span>,<span class="kwrd">true</span>);
                m2.AddItemToList(<span class="str">"5-2"</span>,<span class="str">"Value 5"</span>,<span class="kwrd">true</span>);
                m2.AddItemToList(<span class="str">"6-2"</span>,<span class="str">"Value 6"</span>,<span class="kwrd">true</span>);
                m2.AddItemToList(<span class="str">"7-2"</span>,<span class="str">"Value 7"</span>,<span class="kwrd">false</span>);
                m2.AddItemToList(<span class="str">"8-2"</span>,<span class="str">"Value 8"</span>,<span class="kwrd">false</span>);

                m2.SelectionChanged(<span class="kwrd">function</span>(data)
                {
                    console.log(<span class="str">'List 2, selected values: '</span>+(data.Selection.length));
                });
            }
        );
    <span class="kwrd">&lt;/</span><span class="html">script</span><span class="kwrd">&gt;</span>

<span class="kwrd">&lt;/</span><span class="html">head</span><span class="kwrd">&gt;</span>
<span class="kwrd">&lt;</span><span class="html">body</span><span class="kwrd">&gt;</span>
<span class="kwrd">&lt;</span><span class="html">form</span> <span class="attr">method</span><span class="kwrd">="get"</span><span class="kwrd">&gt;</span>
    <span class="kwrd">&lt;</span><span class="html">div</span> <span class="attr">id</span><span class="kwrd">="EmptySelectContainer"</span><span class="kwrd">&gt;&lt;/</span><span class="html">div</span><span class="kwrd">&gt;</span>
    <span class="kwrd">&lt;</span><span class="html">p</span><span class="kwrd">&gt;</span>hejsa<span class="kwrd">&lt;/</span><span class="html">p</span><span class="kwrd">&gt;</span>
    <span class="kwrd">&lt;</span><span class="html">div</span> <span class="attr">id</span><span class="kwrd">="EmptySelectContainer2"</span><span class="kwrd">&gt;</span>

    <span class="kwrd">&lt;/</span><span class="html">div</span><span class="kwrd">&gt;</span>
    <span class="kwrd">&lt;</span><span class="html">input</span> <span class="attr">type</span><span class="kwrd">="submit"</span> <span class="attr">value</span><span class="kwrd">="submit"</span><span class="kwrd">/&gt;</span>
    <span class="kwrd">&lt;/</span><span class="html">form</span><span class="kwrd">&gt;</span>
<span class="kwrd">&lt;/</span><span class="html">body</span><span class="kwrd">&gt;</span>
<span class="kwrd">&lt;/</span><span class="html">html</span><span class="kwrd">&gt;</span>


Serverside

So, what to do on the serverside to get the data?

Well, the name you apply in the NMultiSelect function above, is the name of the field getting posted to the server.

If we say, you use the ASP.NET MVC framework, your backend would look somewhat like this:

[HttpPost]
<span class="kwrd">public</span> <span class="kwrd">void</span> GiveMeData(<span class="kwrd">string</span> mySelection)
{
    <span class="rem">// Først splittes værdierne:</span>
    <span class="rem">// Ja, vi splitter på komma, i en fremtidig version kan dette ændres!</span>
    <span class="kwrd">string</span>[] mySelectionItems = mySelection.Split(<span class="str">','</span>);

    <span class="rem">// Gennemløb værdierne:</span>
    <span class="kwrd">foreach</span>(<span class="kwrd">string</span> itemId <span class="kwrd">in</span> mySelectionItems)
    {
        <span class="rem">// Du kan her behandle værdierne som du ønsker.</span>
    }
}

PHP

&lt;?php
    <span class="rem"># Få fat i værdierne:</span>
    $selection = $_POST[<span class="str">"mySelection"</span>];

    <span class="rem"># Split værdierne:</span>
    $values = explode(<span class="str">","</span>, $selection);

    <span class="rem"># Gennemløb værdierne:</span>
    <span class="kwrd">foreach</span> ($values as &amp;$value) {
            <span class="rem"># Gør med dataene hvad du vil.</span>
    }

    <span class="rem"># Husk at ryde op:</span>
    unset($value);

?&gt;

Reference

Heres a short reference of all the functions available:

NMultiSelect(name,[move]) Creates a new instance of the NMultiSelect-box on the first item in the applied jQuery object. See exampe above.Name: Name of the field that is posted to the server.

move: Not mandatory! If true, the items will be moved between the boxes, instead of just being copied to the right hand side box. Default is false.

AddSelection() Chooses all selected items in the left hand box.
AddAll() Chooses all items in the left hand box.
RemoveSelection() Removes selected items from the right hand side box.
RemoveAll() Removes all items from the right hand side box.
AddItemToList(value,text,[selected]) Adds an item to the box.value: Value the item should have.

text: Text of the item.

selected: Not mandatory, if true, the item is pre-selected.

SelectionChanged(code) Event you can subscribe. Is called each time a change in the chosen items occur.code: Code to be executed, when the event is fired. The code, must have a parameter, that accepts the same objects as data(‘values’) returns.
data(‘values’) Returns all added items, and all chosen items.More details about data(‘values’) below.

data(‘values’)

If you call data(‘values’), (it’s importent to include the ‘values’ part. This is a jQuery thingy!), you will get an object with two properties:

  • Items
  • Selection

Each of these properties contains a list of objects. Items – A list of all items we’ve added, and selection – A list of all chosen items. Each of these objects has the following properties:

  • Value
  • Text
  • Selected

In the Items-list, all values will be the ones, the item was created with.

In the Selection-list, the only difference would be, that the selected-property will be true.

Download

You can grap the code and an example here:

Download NMultiSelect 1.0
DBTesting

Efter lang tids stilhed kommer her en lille opdatering på hvad jeg har gang i for tiden.

Jeg arbejder på et database-testnings system, DBTesting, til at oprette og køre automatiserede tests af en database under udvikling, så man sikre sig, at de data man får ud, er præcis som de skal være og ikke bliver ændret på nogen måder.

Jeg vil ikke gå så meget i dybden her, men du kan læse mere på hjemmesiden:

http://dbtesting.ndesoft.dk

Start ny mail i MS Outlook fra MS Access

Dette er en mindre fortsættelse til “Start Skype fra MS Access” som jeg skrev for leden.

1. Opret tabel

Vi bruger blot den samme tabel som sidst, denne gang tilføjer vi bare et nyt felt med navnet e-mail:

2. Opret formular

Hvis du har læst foregående guide, vil du have en formular hvor du blot skal tilføje et nyt felt til e-mailen. Hvis du ikke har nogen formular, så opretter du bare en fra guiden. Det er nemmest.

3.  Tilføj knap

De næste trin er nemme nok, du gør blot som i trin 3-5 i “Start Skype fra Access” guiden. Den eneste forskel er blot, at du skal vælge “Kuvert”, “Brev”, “Envelope” eller hvad den hedder som billede.

4. Tilføj VB kode

Du skulle gerne nu have noget kode, der ser nogenlunde sådanne ud:

<span class="kwrd">Private</span> <span class="kwrd">Sub</span> Command20_Click()

<span class="kwrd">End</span> Sub

I mellemrummet tilføjer du denne kode:

<span class="kwrd">Dim</span> Cmd <span class="kwrd">As</span> <span class="kwrd">String</span>
<span class="kwrd">Dim</span> Dir64 <span class="kwrd">As</span> <span class="kwrd">String</span>
<span class="kwrd">Dim</span> Dir32 <span class="kwrd">As</span> <span class="kwrd">String</span>
<span class="kwrd">Dim</span> EmailField <span class="kwrd">As</span> <span class="kwrd">String</span>

<span class="rem">' Name of the field, containing the phonenumber:</span>
EmailField = <span class="str">"email"</span>

<span class="rem">' Outlook default install dir, on both 32 and 64 bit Windows.</span>
<span class="rem">' Change "Office14" to your Office version. 11 = 2003, 12 = 2007, 14 = 2010</span>
Dir32 = <span class="str">"C:Program FilesMicrosoft OfficeOffice14OUTLOOK.exe"</span>
Dir64 = <span class="str">"C:Program Files (x86)Microsoft OfficeOffice14OUTLOOK.exe"</span>

<span class="rem">' Do not edit below this line!</span>

<span class="kwrd">Me</span>(EmailField).SetFocus

Cmd = <span class="str">" /c ipm.note /m "</span> + <span class="kwrd">Me</span>(EmailField).Text

<span class="kwrd">If</span> Dir$(Dir32) &lt;&gt; <span class="str">""</span> <span class="kwrd">Then</span>

    Shell (Dir32 + Cmd)
<span class="kwrd">Else</span>
<span class="kwrd">If</span> Dir$(Dir64) &lt;&gt; <span class="str">""</span> <span class="kwrd">Then</span>

    Shell (Dir64 + Cmd)

<span class="kwrd">Else</span>
    MsgBox (<span class="str">"Microsoft Outlook was not found in default install dir!"</span> &amp; vbCrLf &amp; <span class="str">"Check Office version and/or dir!"</span>)
<span class="kwrd">End</span> <span class="kwrd">If</span>
<span class="kwrd">End</span> If

Den minder lidt om den fra sidst, det du skal ligge mærke til her er felterne “EmailField”, “Dir32/” og “Dir64”. “EmailField” skal selvfølgelig indeholde navnet på det felt, der indeholder e-mail adressen.

“Dir32” og “Dir64” skal tilpasses din version af Office, dvs. teksten “Office14” skal erstattes med “Office11” for Office 2003, “Office 12” for Office 2007 og “Office14” for Office 2010.

Scriptet kan udvides med flere funktioner, læs mere her:

http://office.microsoft.com/en-us/outlook/HP010031101033.aspx

Start Skype fra MS Access

For leden fik kom en af mine kollegaer og beklagede sig over at han ikke var i stand til at klikke på en knap i Microsoft Access, som så åbnede Skype og ringede op til et telefon nummer, der er angivet i et felt på formularen.

Jeg fandt, så hurtigt på en løsning. Ved at tilføje en lille stump VB kode til en knap, kan jeg starte Skype og ringe op, helt uden at skulle klippe eller klistre.

Metoden er ganske simpel:

1. Starter med en tabel:

Først opretter vi en tabel med to felter: ID (autonummereret) og telephonenumber (datatypen er underordnet!)

2. Opret formular:

Så opretter vi en formular til at indtaste vores data og vise vores data. Du kan bare bruge auto genereringen hvis ikke du vil designe den fra bunden.

3. Tilføj knap:

Så tilføjer vi en knap på formen, lettest at gøre i layout visningen.

4. Tilpasser knappen:

Gør knappen mere brugervenlig med et lille ikon, fremfor teksten:

I egenskabsfeltet, slet teksten i "Caption" eller "Tekst" feltet, alt efter versionen af Access du har (Der skulle gerne stå noget i stil med "Command" eller "Kommando" efterfulgt af et nummer.

Klik på knappen med de tre prikker ud for feltet "Picture" eller "Billede" og vælg "Phone" eller "Telefon" på listen.

Klik OK.

5. Tilføj handling (Event):

Klik på fanen handling, eller event, og klik på knappen med tre prikker ud for feltet "on click" eller "ved klik".

6. Tilføj VB script, og du er kørende:

Du skulle gerne få et vindue, hvor indholdet minder om dette:

<span class="kwrd">Private</span> <span class="kwrd">Sub</span> Command14_Click()

<span class="kwrd">End</span> Sub

.csharpcode, .csharpcode pre
{
font-size: small;
color: black;
font-family: consolas, “Courier New”, courier, monospace;
background-color: #ffffff;
/*white-space: pre;*/
}
.csharpcode pre { margin: 0em; }
.csharpcode .rem { color: #008000; }
.csharpcode .kwrd { color: #0000ff; }
.csharpcode .str { color: #006080; }
.csharpcode .op { color: #0000c0; }
.csharpcode .preproc { color: #cc6633; }
.csharpcode .asp { background-color: #ffff00; }
.csharpcode .html { color: #800000; }
.csharpcode .attr { color: #ff0000; }
.csharpcode .alt
{
background-color: #f4f4f4;
width: 100%;
margin: 0em;
}
.csharpcode .lnum { color: #606060; }


I mellemrummet skal du tilføje denne kode:

<span class="kwrd">Dim</span> Cmd <span class="kwrd">As</span> <span class="kwrd">String</span>
<span class="kwrd">Dim</span> Dir64 <span class="kwrd">As</span> <span class="kwrd">String</span>
<span class="kwrd">Dim</span> Dir32 <span class="kwrd">As</span> <span class="kwrd">String</span>
<span class="kwrd">Dim</span> CountryCode <span class="kwrd">As</span> <span class="kwrd">String</span>
<span class="kwrd">Dim</span> PhoneNumberField <span class="kwrd">As</span> <span class="kwrd">String</span>

<span class="rem">' Name of the field, containing the phonenumber:</span>
PhoneNumberField = <span class="str">&quot;telephone&quot;</span>

<span class="rem">' Country code. +45 for Denmark.</span>
CountryCode = <span class="str">&quot;+45&quot;</span>

<span class="rem">' Skype default install dir, on both 32 and 64 bit Windows.</span>
Dir32 = <span class="str">&quot;C:Program FilesSkypePhoneSkype.exe&quot;</span>
Dir64 = <span class="str">&quot;C:Program Files (x86)SkypePhoneSkype.exe&quot;</span>

<span class="rem">' Do not edit below this line!</span>

<span class="kwrd">Me</span>(PhoneNumberField).SetFocus

Cmd = <span class="str">&quot; /callto:&quot;</span> + CountryCode + <span class="kwrd">Me</span>(PhoneNumberField).Text

<span class="kwrd">If</span> Dir$(Dir32) &lt;&gt; <span class="str">&quot;&quot;</span> <span class="kwrd">Then</span>

    Shell (Dir32 + Cmd)
<span class="kwrd">Else</span>
<span class="kwrd">If</span> Dir$(Dir64) &lt;&gt; <span class="str">&quot;&quot;</span> <span class="kwrd">Then</span>

    Shell (Dir64 + Cmd)

<span class="kwrd">Else</span>
    MsgBox (<span class="str">&quot;Skype Client was not found in default install dir!&quot;</span>)
<span class="kwrd">End</span> <span class="kwrd">If</span>
<span class="kwrd">End</span> If

.csharpcode, .csharpcode pre
{
font-size: small;
color: black;
font-family: consolas, “Courier New”, courier, monospace;
background-color: #ffffff;
/*white-space: pre;*/
}
.csharpcode pre { margin: 0em; }
.csharpcode .rem { color: #008000; }
.csharpcode .kwrd { color: #0000ff; }
.csharpcode .str { color: #006080; }
.csharpcode .op { color: #0000c0; }
.csharpcode .preproc { color: #cc6633; }
.csharpcode .asp { background-color: #ffff00; }
.csharpcode .html { color: #800000; }
.csharpcode .attr { color: #ff0000; }
.csharpcode .alt
{
background-color: #f4f4f4;
width: 100%;
margin: 0em;
}
.csharpcode .lnum { color: #606060; }

Lig mærke til felterne PhoneNumberField og CountryCode.

PhoneNumberField, skal være navnet på det felt, hvor telefonnummeret findes, i dette tilfælde “telephone” og CountryCode, skal være landekoden for modtageren af opkaldet. Skype spørger dog selv, om landekoden, men vil ikke starte uden.

Hovedopgave

hovedopgave screendump

Så er jeg endelig kommet i gang med min hovedopgave, efter en re-re-eksamen i System Udviklings Metoder.

Min gruppe og jeg har i den forbindelse, valgt at lave en blog, hvor vi ligger alle vores aktiviteter og alle vores dagrapporter op, så hvis der skulle være en interesse, så kig endelig forbi og følg med.

Vi bliver ved med at opdatere bloggen indtil d. 10/12 2009.

Se hovedopgavebloggen her.

NMapper v2.0

NMapper Logo

NMapper Logo

Så er jeg i gang med version 2 af min NMapper.

NMapper v2.0 kommer til at have følgende features:

  • Alt fra de foregående versioner.
  • Forbedret cache system.
  • Nyt DB Manager system.
    • Ansvaret flyttes fra managerne til NMapperen.
  • Mulighed for at lave instanser af datamapperen så man kan bruge flere DB managere.
  • Helt ny indre struktur.
  • Forbedret ydelse.
  • Flere generelle og automatiserede metoder.
  • Mulighed for at få taget tid på SQL kaldene.
  • Og meget mere.

Håber at blive færdig om 2-3 måneder. Hvis du har idéer eller ønsker til yderligere funktionalitet så må du gerne smide en kommentar herunder.

XML DBManager

commentxml1[1]Så er min XML Manager til NMapperen, ved at være godt moden. Jeg bruger den på mit arbejde, sammen med NMapperen, selvfølgelig, og har i den forbindelse fundet en hel del svagheder i den. I den seneste version er de fleste af de svagheder blevet helbredt.

Et af mine problemer opstod da jeg ville indsætte 9445 rækker i en tabel (xml fil) navigate to these guys. Den insisterede på at gemme filen for hver indsættelse. Det tog evigheder, sad i en halv time og ventede.

Så slog det mig. Indsæt en buffer, der indeholder alle XML-filer fra de oprettes eller indlæses, og så lade en tråd gemme de filer en gang i mellem.

På den måde skal der faktisk kun læses een gang fra harddisken og kun skrives til disken samtidig med at cachen renser sig selv.

NModules

Til den seneste version af NMapper’en har jeg haft brug for en modul styrings komponent. Det er der kommet NModules ud af.

I NModules kan du registrere flere interfaces. NModules gennemsøger så en mappe for dll’er og finder alle de klasser der implementere et registreret interface. Ud af de klasser kan NModules så lave instanser som kan bruges som var de hårdkodet i systemet.