Basically, a dotnet solution is made up of one or more projects. Each of these projects have a project file, .csproj og .vbproj. If you’ve ever been working on a dotnet project, you’d already know this.
When we, the bureau I’m with, create new projects, we need to remember to add all sorts of configurations. All of them are shared between projects. Configurations like these:
This post is more of an architectural walk through of the ideas rather than a complete running application.
Even though I do not mention Azure Functions, I highly recommend using them when working with queues and Service Bus. You can do without, but doing so is more difficult.
Setup
Many systems have some sort of pipeline, a series of tasks running after each other, to accomplish a goal. That could be completing a purchase, importing products, or migrating a database.
Each of these pipelines consists of several tasks.
If we look at the “import product” pipeline, we might only have one task, “import product”, but we will execute that task thousands of times before all products has been imported. We might consider an “import product” pipeline, to be one large collection of tasks:
Import product 1
Import product 2
Import product 3
…
Import product 4567
This just looks like an ordinary queue, add a bunch of tasks, execute one by one.
If one execution fails, say the product is missing information, the rest of the products should still be imported. A queue does not really care about the whole, only each message.
If we, then, look at a pipeline for completing a purchase, we might have more tasks. These could look similar to these:
Generate order number
Calculate total payment
Process payment
Generate order receipt (PDF)
Send email with the receipt
Each of these tasks must be executed in that exact order, we cannot process payment before having calculated the total costs. Sending an email before having a receipt would not make sense and all the tasks need an order number. We must also handle situations where any of the tasks might fail. And if so, none of the remaining tasks must be executed. It would be bad to send a receipt to the customer if the payment has not gone through.
Again, this is just a queue, executing messages one at a time. However, this is a First-In-First-Out queue. The first item on the queue, is the first one to be executed. Then the next, and so on.
When importing products, say by uploading an excel spread sheet, we add each row (product) to the queue. This we will call a job: Upload excel sheet, loop through each row, add row to the queue. When we upload a second spreadsheet, we will create a second job to not interfere with the first job. In fact, we will create a second queue. So, one queue per job, each job has a set of tasks. The same goes for the purchase pipeline. Each order completion creates a new job with a list of tasks to execute.
Azure Service Bus
In a “normal” or traditional approach, we would make a simple loop that loops through each of our tasks and executes them one at a time. It is simple and it works:
Nothing too fancy here. However, we have no idea how long it will take to execute all the tasks. If it takes a second, no problem. If it takes minutes, then the user might experience timeouts or think something went wrong.
Another issue here, is also error handling. How do we handle errors? Well, we could wrap each task in a try-catch. Or we could wrap the entire loop in a try-catch. Doing the former, we would be able to try that task again, if it keeps failing, we could stop the loop, or continue with the next task. The latter would break out of the loop, always, with no way to retry the failing task.
Both still suffer from bad error-handling. Say, we call an external service that is down for maintenance. If we retry a task 5 times with a second in between, chances are we will not get a success. The task will fail. And if a task fails, how do we retry that task when the service is up again? Furthermore, if we have prevented the remaining tasks from executing, how do we execute those when the service is back online? How do we know how many and which tasks needs to be executed?
To do this, we need to offload our task execution and loops. There are many tools and services out there, but I will focus on Azure Service Bus.
Azure Service Bus is a First-In-First-Out queue. Messages, (tasks on a queue is called messages), are being executed in the order in which they have been added to the queue. Using Azure Storage Queues, messages are being handled more or less randomly.
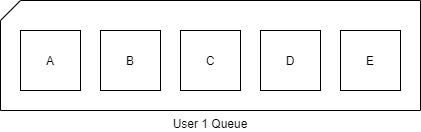
If we look at the purchase example above, our what we want our queue to look like is something like this:
However, if two orders are getting completed simultaneously our queue might end up looking like this:
And that is bad. First, we do not know which task belongs to which context, or job, without adding a lot of meta data to our messages, and we cannot easily stop the execution for one task and the following tasks without interfering with other jobs.
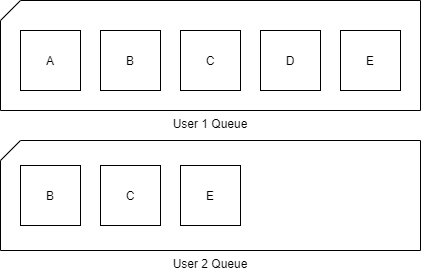
Luckily for us, Service Bus also supports, what they call, “Sessions”. Sessions are a way to logically group several tasks by an id called SessionId, into separate queues.
So, two simultaneous jobs would look a little like this:
See, two queues, two contexts. If one fails, the other continues.
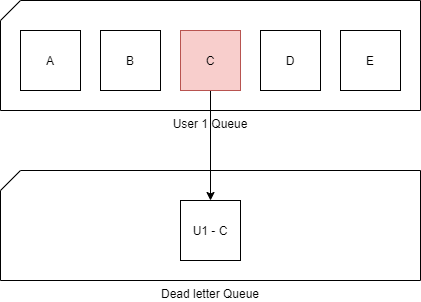
Service Bus can also handle errors. By default, if a task fails more than 10 times, it will be deemed undeliverable and sent to a so-called “dead letter queue”. In Storage Queues, these are called poison queues.
In the case of our product Import, if product number 572 fails 10 times, it will be sent to the dead-letter queue. And the next message is being handled:
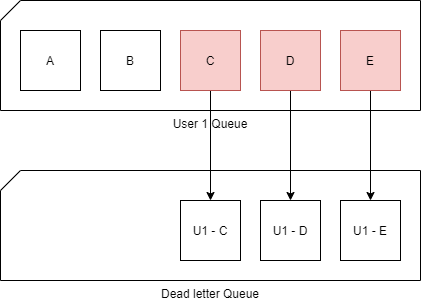
The same goes for the purchase pipeline. If the payment processing fails 10 or more times it will go into the dead-letter queue. However, it will not stop the execution of the remaining tasks. It will continue to the next one.
That works great on a product import where we do not want to cancel the remaining 4000 product imports just because one failed. But in a purchase completion pipeline, we must stop.
To do that, we can utilize something called “Session State”.
Session State
Now we are getting into something that is not very well documented.
Before I knew about the session state, I looked at the problem:
I have a task that has failed. I must move the task into the dead-letter queue and then move the remaining tasks into the dead-letter queue as well.
Problem is, we are dealing with queues. You are not meant to loop through messages on a queue and move them around. You need to wait until you receive a message and then process it.
So, I built something very elaborate, that would wait for 30 seconds and retrieve all messages and the move them into the dead-letter queue.
The problem with this approach became apparent fast. First off, I cannot be sure that all messages are available within 30 seconds. Second, reading from the queue the way I did, did not ensure correct order. And third, I fell straight into a session locking hell where the session was being locked and opened and re-locked at random making the application unstable.
Digging further into Session State, I learned that the session state is always null, until you set it to something not-null. Once you set it, it is available to every task for that session, even for tasks that are added afterwards. This can be (mis)used.
I never found any real documentation on the use for the session state, and since it’s always null and I can set it to whatever I want, I chose to invent my own state object:
public class SessionState
{
	public bool IsFailedSession { get; set; }
}
I can then create a new instance, serialize into json and bytes, set the state. The next task can then see whether we are in a failed state or not.
The way I set the state is shown here:
public static class MessageSessionExtensions
{
	public static Task SetSessionStateAsync(this IMessageSession messageSession, SessionState state)
	{
		byte[] bytes = null;
		if (state != null)
		{
			var json = JsonConvert.SerializeObject(state);
			bytes = Encoding.UTF8.GetBytes(json);
		}

		return messageSession.SetStateAsync(bytes);
	}

	public static async Task<SessionState> GetSessionStateAsync(this IMessageSession messageSession)
	{
		byte[] bytes = await messageSession.GetStateAsync();

		SessionState state = null;
		if (bytes != null)
		{
			var json = Encoding.UTF8.GetString(bytes);
			state = JsonConvert.DeserializeObject<SessionState>(json);
		}

		return state;
	}
}
It is quite basic serialize to Json, get the bytes and call SetState. To get the state, is the same. But in reverse. Nothing fancy.
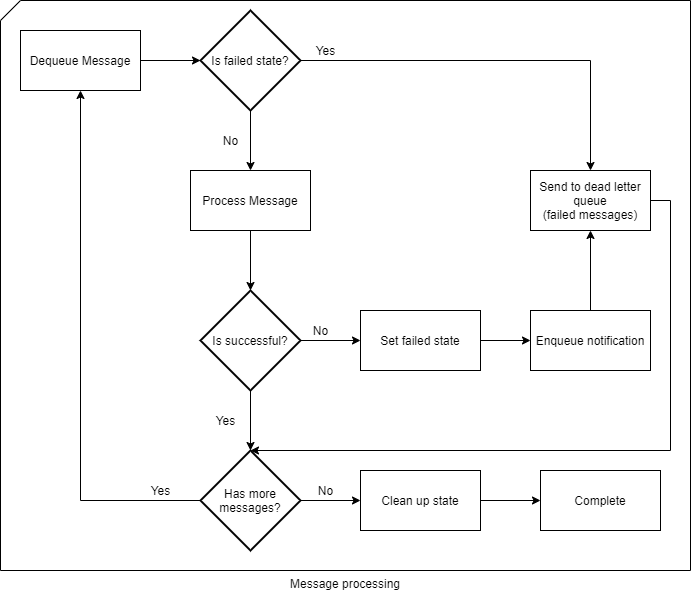
When executing a task, I will first get the session state. If IsFailedSession == true then send the message straight into the dead-letter queue, without executing it.
Word of caution though. The Session State takes up storage. Storage you are paying for. And session state is, from what I can tell, permanent. You will have to clean it up.
Previously, there was an API we could use to clean up the session state occasionally. However, in the new .NET Core / Standard libraries, this API is no longer present (https://github.com/Azure/azure-service-bus/issues/275).
To make sure we do not use storage we do not need, we must clear the state on the last message. What I have chosen to do, is add a property to my message indicating whether this is the last message or not.
When processing the message, I will then call SetState(null) when IsLastMessage == true. If and when the old API returns, I would make an Azure Function run once a day to clean up states.
This flow chart might explain better what I am trying to do:
At this point, we send failed messages to the dead-letter queue and prevents execution of the remaining tasks.
How do we handle those errors?
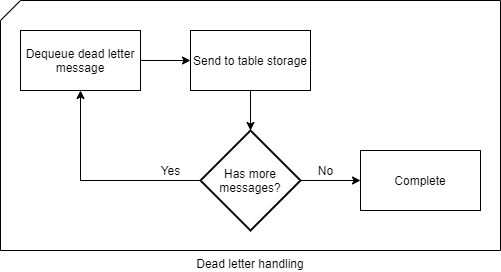
The dead-letter queue is a queue, so we cannot enumerate the list and get all related tasks and re-add them to the main queue. And since the dead-letter queue, does not support sessions, everything is mixed with each other.
Introducing Azure Table Storage. Table Storages has two main fields: Partition Key and Row key. The Partition Key identifies a partition, or a group of rows and the row key is the unique id of the row. The combination of partition key and row key must be unique.
What that gives us, is the ability to logically group our messages. Say by Session id. This way, we can literally move messages from our dead-letter queue into a table storage 1-1. With our session id as our partition key and the unique message id, SequenceNumber, as our row key.
We can then add our message body as a separate field and just post it there, raw.
Another neat thing is, we can set a reason for why we have added a message to the dead-letter queue.
That message could be the exception that was thrown, or that it was sent to the dead-letter queue because of it being in a failed state from a previous task.
If we add that information to the table, we can even look all the errors up and handle the individually later.
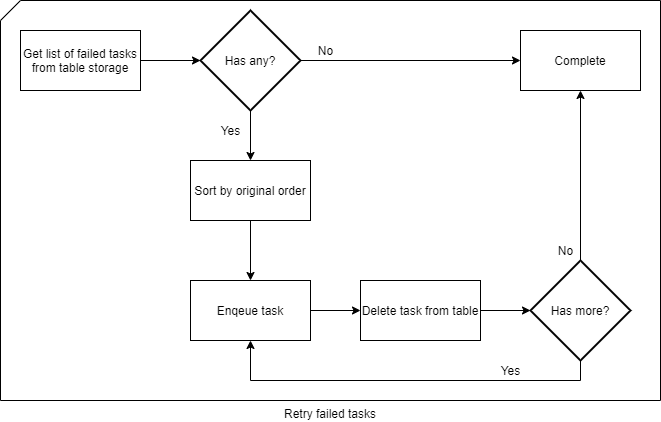
The flow looks similar to this:
Say the “Generate PDF” from earlier had failed. A patch has been deployed and we want to execute everything that has failed on that task. Well, we would just search through our table for that specific message and then send all messages that shares the same partition key to the service bus. Ordered by the row key, the failed task, and the remaining tasks, will be executed in the exact same order as originally.
A side note: When sending / re-adding the messages to the Service Bus queue, make sure you do not re-use the session id. By doing so, you might end up mixing states. Re-adding messages to the queue, is a new job or a new session, therefore it requires a new session id.
If the job fails again, it will be added back to the table.
Umbraco HQ offers a paid hosted headless implementation of Umbraco called ”Heartcore”. This is good for some, but for others that wants more than Umbraco Heartcore can offer, there is not much help from the Umbraco Core, since Heartcore more or less runs a custom build / highly modified version of Umbraco that we cannot utilize.
So, we are essentially forced to build our own headless implementation on top of Umbraco to get the same functions.
In this post, I am going to share my experience with building a headless API on top of Umbraco and the issues I have encountered.
My implementation will not be compatible with the way Umbraco has chosen to do Heartcore, but it would be interesting if, at some point, the client libraries that is used for Heartcore, could be used for on premise installs as well.
But, as this is just a PoC based upon own experiences on requirements, it will not be compliant or feature complete. At all. But it will work.
I expect you know about route hijacking, composers and components, web api and other rather advanced stuff.
I will upload my code to GitHub. That code will be more complete than this post.
Routing
First things first, we need to setup some custom routes. Since we are, essentially, building a RESTful API, I think the routes should be prefixed with “/api”. This way we distinguish between our API’s and other endpoints.
I have identified at least 4 routes:
/api/content/{contentGuid}
/api/media/{mediaGuid}
/api/sitemap/{parentGuid}
/api/dictionary
The “parentGuid” parameter is optional.
These 4 endpoints add a few problems that needs to be resolved:
Finding correct content page and variation from guid.
Setting the Umbraco context up with the correct content, as it would have been done on a normal request.
Routing into custom doctype controllers, as one would do with a normal Umbraco site.
NB: One might argue about using RouteTable.Routes.MapUmbracoRoute and implement an IContentFinder instead of the way shown here. But that is for MVC routes and controllers, and that gave me a lot of headaches…
Finding the correct Umbraco page
Finding content by id has always been easy in Umbraco, prior to v8. The introduction of variations adds an awesome editor experience but for what we are doing, it adds a bit of complexity.
When Umbraco receives a request, it finds a matching domain and its corresponding culture code, (simplified). It then uses that culture code to setup the variation context. This context is then used to select the correct variation whenever a content is requested.
But since we are running on a completely different server, with a completely different domain, we cannot rely on this method. So, we need the client to tell us witch variation is needed. And the only way to do that is with one of two methods: query string og header.
Looking at the Heartcore documentation, I found that they support both:
Query: ?culture=en-US
Header: Accept-Language: en-US
That we can work with.
So now we have the content id, and the culture code, now we need to find the content.
As you will see later, this code is going to be reused and we need to call it before the request hits our controller action to setup the Umbraco context before we will be using it. So, we need an ActionFilter attribute.
I have called mine “UmbracoPageFilterAttribute”. This action filter finds a content variation by id and culture code and sets up the Umbraco context. It also returns a 404 Not Found response if no content was found.
In the action filter class, we have to override the OnActionExecutingAsync method. This method is executed just before our action itself. This way, we can setup everything before we need it.
First thing, is to get the controller instance, that is being executed, it is as easy as this:
if (actionContext.ControllerContext.Controller is UmbracoApiController controller)
Notice that I test for the controller being an Umbraco API controller. This is because I need access to the Umbraco context, and this is the simplest way.
The second thing we need to do, is to get the culture code from the request and set the variation context.
var request = actionContext.Request;
var cultureCode = request.GetQueryNameValuePairs().FirstOrDefault(q => q.Key.Equals("culture", StringComparison.InvariantCultureIgnoreCase)).Value;

if (string.IsNullOrWhiteSpace(cultureCode))
{
	cultureCode = request.Headers.AcceptLanguage.FirstOrDefault()?.Value;
}
This code tries to get the culture code, first from the query string, then from the Accept-Language header.
We are then going to use this value to set the VariationContext. And that turns out to be really simple:
controller.UmbracoContext.VariationContextAccessor.VariationContext = new VariationContext(cultureCode);
Just set the variation context to a new instance with the culture code from the request, and you are golden.
Then we need to get the content guid from the route data and use that to find the content:
string routeContentGuid = actionContext.Request.GetRouteData().Values["contentGuid"] as string;

if (string.IsNullOrWhiteSpace(routeContentGuid) || !Guid.TryParse(routeContentGuid, out var contentGuid))
{
	return null;
}

var content = controller.UmbracoContext.Content.GetById(contentGuid);
There it is. The correct page in the correct variation.
When we have our content, we need to verify that content and its cultures. We do not want to return content that does not have the cultures being requested:
Next up, is setting up the Umbraco Context with this newly found, valid, content. This part is quite simple and heavily “inspired” by the way Umbraco does it.
var router = GlobalConfiguration.Configuration.DependencyResolver.GetService(typeof(IPublishedRouter)) as IPublishedRouter;

var contentRequest = router.CreateRequest(controller.UmbracoContext, new Uri(content.Url, UriKind.RelativeOrAbsolute));

contentRequest.PublishedContent = content;

if (!router.PrepareRequest(contentRequest))
{
	router.UpdateRequestToNotFound(contentRequest);
}
First, we need a reference to Umbraco own IPublishedRouter. We will use that router to create a content request, telling Umbraco that a request has been made to a URL that points to a content page.
We then go on to set the PublishedContent property on that request. This tells Umbraco that the request has found a valid content page.
We then call the “PrepareRequest” method on the router. This is where the magic happens. This method sets up the Umbraco context as if this request were any other normal request to an MVC controller. And if that fails, we escalate the request to be a not found request. I have yet to figure out what would cause it to fail, but Umbraco does it this way, so I figured I should to.
The final step is to tell our controller about this content request, and the content we have found:
That is how you find a content page variation and setup the Umbraco Context for custom API’s using an Action Filter.
Content route
Having found our content, we can now move on the next part. Routing.
Umbraco has a “catch all route” that maps all requests, that doesn’t have any other routes, into the “RenderMvcController”. This controller first tries to find a controller by document type, for Route Hijacking, then an action by template. If a controller and action is found, it will execute said action and return the result. Otherwise, it will just return a view result, pointing at a view with the template name, passing in the content as a model.
We will do some of this as well. Only difference here is, we do not want to return the content directly since the serialization of IPublishedContent could become a recursive nightmare. And we do not care about templates. Since we only return json, and do not care about how the frontend wants to present the data.
This maps a route to a web api controller called “ContentApi”. I have chosen to add the controller to an area for better isolation, you do not have to do this.
Before building the controller, we need a way to identify all our custom controllers. An easy way is to create an interface, IHeadlessPageController.
The interface is quite simple. At the moment, it has no members but that can change.
Then we need to identify all controllers that implements that interface and extends the UmbracoApiController. This way we can ignore any implementation that does not have the contexts we need.
private static readonly Type PageControllerType = typeof(IHeadlessPageController);
public static readonly Type UmbracoApiControllerType = typeof(UmbracoApiController);

internal static readonly Lazy<Dictionary<string, HttpControllerDescriptor>> ControllerMappings =
	new Lazy<Dictionary<string, HttpControllerDescriptor>>(
		() =>
		{
			IHttpControllerSelector httpControllerSelector = GlobalConfiguration.Configuration.Services.GetHttpControllerSelector();
			IDictionary<string, HttpControllerDescriptor> controllerMappings = httpControllerSelector.GetControllerMapping();
			return controllerMappings.Where(c => PageControllerType.IsAssignableFrom(c.Value.ControllerType) && UmbracoApiControllerType.IsAssignableFrom(c.Value.ControllerType)).ToDictionary(c => c.Key.ToLower(), c => c.Value);
		},
		true);
A lot is going on here, but it is quite simple. First identify the types, then find all the controllers that is assignable from those types. And we will do it lazily, to only find the controllers when the application is loaded, all controllers have been registered and the controllers are needed.
The way to find the controllers, are quite simple. Just loop through all the registered controllers, filter on type and return a dictionary where the key is the controller name.
The code above, I have chosen to put into a helper class called ControllerHelper. (Again, separation of concern).
Looking at the route, “api/content/{contentGuid}”, registered above, we can see that we need a controller called ContentApiController with an action called Get.
The Get action must first try to find the controller and set the route values so they match what would have been there if the request had been directly to the controller:
private HttpControllerDescriptor GetControllerDescriptor()
{
	var currentPage = this.UmbracoContext.PublishedRequest != null ? this.Umbraco.AssignedContentItem : null; ;
	if (currentPage != null && ControllerHelper.ControllerMappings.Value.TryGetValue(currentPage.ContentType.Alias.ToLower(), out var controllerDescriptor))
	{
		this.ControllerContext.RouteData.Values["action"] = "Index";
		this.ControllerContext.RouteData.Values["controller"] = this.Umbraco.AssignedContentItem.ContentType.Alias;

		return controllerDescriptor;
	}
	else
	{
		return null;
	}
}
Nothing much going on, it is mostly null checks. But not line 6-7. We override the route values “action” and “controller”. “Action” is set to “Index”. If we wanted to support templates, as per default Umbraco, we had to test for an action with that name and set the value accordingly. Since we do not want to support templates, we can dictate the action to always be “Index”. I will come back to that later.
The “controller” value is set to the document type alias. This is also the way Umbraco does it.
If we cannot find a matching controller, we will just return not found to the user. Otherwise we will return a 404 not found.
Having found the controller and set the route values, we can now execute the controller and return the result:
var controller = controllerDescriptor.CreateController(this.Request);
var controllerContext = new HttpControllerContext(this.RequestContext, this.Request, controllerDescriptor, controller);
var responseMessage = await controller.ExecuteAsync(controllerContext, cancellationToken);

var result = this.ResponseMessage(responseMessage);

return result;
This is mostly boilerplate: Create an instance of the controller, setup the controller context, execute the action and return the result.
Page controllers
We now have found the content and built logic to find the controller and execute said controller. Now we must build the page controllers. When doing route hijacking, Umbraco looks for a controller that inherits from “RenderMvcController”. As we are using web api, we cannot use this class so we need to invent our own. I will do this in two steps: HeadlessController and HeadlessPageController.
HeadlessController
This controller is the basis for all headless controllers. Be that page controllers or other types of controllers.
All this does is returning the content we have found earlier.
HeadlessPageController
This is the base for all page controllers. We are using this base class as a way to ensure we have an Index action that supports HTTP GET requests, and making the developers life a bit easier by setting a current page as the models builder type instead of IPublishedContent:
public abstract class HeadlessPageController<TContent> : HeadlessController, IHeadlessPageController
	where TContent : IPublishedContent
{
	protected TContent CurrentPage => (TContent)this.GetCurrentPage();

	[HttpGet]
	public abstract IHttpActionResult Index();
}
Nothing much is going on, but I really like to use the strongly typed models instead of IPublishedContent.
And now we are ready to make our page controllers, using the same formula as we would with a vanilla Umbraco install.
Create a controller named after the document type, make it inherit from the HeadlessPageController and implement the Index method:
public class HomeController : HeadlessPageController<Home>
{
	public override IHttpActionResult Index()
	{
		throw new System.NotImplementedException();
	}
}
Now we need to build a model that represents the home page. I have used the starter pack so my properties will match those.
I think the model for the home page should be simple, for this post. I will add only one property:
public class HomeModel
{
	public string Header { get; internal set; }
}
We can now fill the Index action with this logic:
public override IHttpActionResult Index()
{
	var model = new HomeModel()
	{
		Header = this.CurrentPage.HeroHeader,
	};

	return this.Ok(model);
}
If you launch Umbraco, log in and selects the home page. Add a domain, I’ve added test.local and selected en-US as language. Find the page guid and call the url:
HTTP GET /api/content/{pageGuid}
Header: Accept-Language: en-US.
Replace {pageGuid} with the guid copied earlier.
You should then get something that looks like this:
{
	"Header": "Umbraco Demo"
}
That is great, but we lack a lot of information about the page. Information like content type, Id, name and possibly other properties. I have chosen to include Create- and UpdateDate as well.
These values are something we want to add to all page results. So, we add a new model: PageData.
The PageData model
To contain the properties, I start creating an interface called ISimplePageData:
This interface is used to build a method that can be used to map these properties in a reusable fashion. That mapping logic will be placed in the HeadlessController:
Nothing to it really. We then create the page data model:
public class PageData<TPageModel> : ISimplePageData
{
		public string ContentType { get; set; }

		public Guid Id { get; set; }

		public string Name { get; set; }

		public DateTime CreateDate { get; set; }

	public DateTime UpdateDate { get; set; }

	public TPageModel Page { get; set; }
}
This class is a generic class, that adds the page model as a property.
To ensure every page model is wrapped with this class, we add a couple of new methods to the HeadlessPageController: One that returns OkNegotiatedContentResult and one that wraps the page model in the new PageData model.
protected OkNegotiatedContentResult<PageData<TPageModel>> PageData<TPageModel>(TPageModel pageData)
{
	PageData<TPageModel> model = this.WrapPageData(pageData);

	return this.Ok(model);
}

protected virtual PageData<TPageModel> WrapPageData<TPageModel>(TPageModel pageData)
{
	var model = new PageData<TPageModel>()
	{
		Page = pageData,
	};

	this.MapSimplePageData(model);

	return model;
}
Now we can modify the HomeController to return this.PageData(model); instead of this.Ok(model).
Making the call from above, you would get something that looks a little like this:
I will add my code to GitHub as soon as I have cleaned it up a bit. I have a few issues that I would like input to fix.
One of the issues is CORS. Currently my code forces the developer to add the [HttpOptions] attribute to almost anything. That is quite annoying.
Some of the things I have not covered in this article is how to add non-page controllers like site maps, dictionary, and global data or how to handle media. How to set caching headers and setting up Swagger.
I have not investigated how I would implement the preview function, that now actually works in Umbraco.
This method I have presented here, can be used for more than just Umbraco Content. You can add data from third parties, eg. uCommerce, the same way you would have done in a normal Umbraco site.
And there are thousands of other things I have not even thought about yet. This is merely a proof of concept that might / might not, end up with being a package.
The previous two parts demonstrated how to split your application into smaller parts, each with their own small task, e.g. Separation of Concern. You’ve also seen how to use dependency injection in different types of applications in a standardized way with as little code reuse as possible. With each library handling all the registration of its services and dependencies.
In this part, we will move a bit back from our libraries and into the application side. In this part, we’re going to look into settings and how to use them.
We have 3 libraries, used by four different applications. Each of our three libraries has services that requires some form of configuration.
The DAL library needs a connection string. The Azure Storage library needs some keys to access an Azure Storage account. And the email library needs some information about the SMTP server, the sender, CC, BCC and so on. To configure that, is quite easy. Just put all the configurations into a config file, load it up and we’re good to go. But is that really the best way to do that?
We have 4 different applications, each of these has different ways to handle configuration:
ASP.NET Core uses appsettings.json and environment variables.
Azure Functions uses environment variables
The console app uses command line arguments.
The UWP app doesn’t seem to have anything buildin, but we will have our settings stored in a settings.ini file, just for fun.
In .NET Core, you can mix and match all you want, and we can get appsettings.json functionality in all of our application types. However, each application type has its own usages.
The ASP.NET Core application is usually run on a web server of sorts, where config files can help setup multiple instances of the same application with the same settings.
The Azure Functions is running in a “serverless”, (read: hosted), Azure environment, where you might want to have your configurations managed by Azure, since we don’t really know, or care about, where the code is running. So, here we’ll use environment variables instead of a config file.
A CLI application could use a config file, but since it’s a console line interface application, I might want to have the settings be set as arguments instead of a file. This way we can easily batch different jobs, with different configurations and execute from the same folder.
And our UWP is a piece of end-user software. We cannot expect the end user to know how to modify a json/xml/text config file, set/change environment variables or load up some proprietary database file just to change the sender email address. In this case, we might want to build a “settings”-page within the application.
If we had to add logic, within all our libraries to handle each of these scenarios. Our code would be massively cluttered and full of duplicate code. So instead, we need to let our application do the configuration of our libraries instead.
But first, we need to modify our libraries so that they can be configured:
This package will add an extension method to the IServiceCollection that looks like this: “Configure<TOptions>(Action<TOptions> configureOptions)”
You might know this method from ASP.NET Core, as it comes as part of that.
What it does is quite simple: First, it creates an instance of TOptions, then it calls the configureOptions action delegate to populate the options instance. Then it adds it to our DI using 3 different interfaces:
IOptions<TOptions>
IOptionsMonitor<TOptions>
IOptionsSnapshot<TOptions>
I won’t go into detail about these interfaces here but take a look at the link above. It describes it quite well.
So, we will configure our options using the Configure extension method and the we can inject, using DI, those options into our different services as needed.
First, we’ll need to create our options class. I usually create a folder called “Options” where I put my options classes. I will only show one example here but check out the code on github to see all of them.
public class AzureStorageOptions
{
    public string ConnectionString { get; set; }
}
This example is for the Azure Storage project. And, as you can see, an options class is not very complex.
We will then register that option, using the Configure method from above:
See, simple. But wait. We have still not configured anything. Just hardcoded the connection string directly into our code. And further, we aren’t using the options anywhere.
That shit won’t fly!
Negan, A-hole extraordinaire – The Walking Dead
So, first of we need to move the configuration out of our library. To do that, I will just add the configureOptions task delegate to the, in this case, AddStorage method. And it will look like this:
We need to use the connection string from our options, and not this hardcoded value. And that is actually quite simple:
services.AddSingleton(provider =>
{
    var options = provider.GetRequiredService<IOptionsMonitor<AzureStorageOptions>>();

    return CloudStorageAccount.Parse(options.CurrentValue.ConnectionString);
});
This code gets the options from the. And since we cannot run the application without it, it is fair to use “GetRequiredService”. We then use the current value of the options instance to get our connection string and pass it into the Parse method. Simple.
But there’s more. We have a QueueService, that has a hardcoded value as well. We have to move that out into our configuration logic as well.
So first up, we need to extend the options class:
public class AzureStorageOptions
{
    public string ConnectionString { get; set; }

    public string QueueName { get; set; }
}
And currently, the QueueService looks like this:
public class QueueService : QueueClient<QueueModel>, IQueueService, IQueueClient<QueueModel>
{
    public QueueService(CloudQueueClient cloudQueueClient)
        : base(cloudQueueClient, "queue-name")

    {
    }
}
We need to remove the hard coded “queue-name” and use the QueueName property from the configured options. And that is quite simple:
public class QueueService : QueueClient<QueueModel>, IQueueService, IQueueClient<QueueModel>
{
    public QueueService(CloudQueueClient cloudQueueClient, IOptionsSnapshot<AzureStorageOptions> options)
        : base(cloudQueueClient, options.Value.QueueName)

    {
    }
}
As you can see, we just inject the options as an IOptionsSnapshot instance and use the value from there. And the wonderful part here is, that you can inject the options anywhere in your code. Not just within your library. But also, in the user interface or logging, not that you should log the connection string, but you could log or display the queue name in the UWP app and ignore the value in the ASP.NET application. It’s up to you. All that matters is that our library and its services has been configured.
Configuring the applications
All we need to do now, is to configure the applications themselves. And it’s also quite simple.
ASP.NET Core
Most of the ASP.NET Core configuration can be automated using the Bind() extension method on the IConfiguration interface. The extension method is located in this namespace: Microsoft.Extensions.Configuration.
All you need to do is update your call to the AddStorage method into this:
As you can see, the json properties maps directly to the properties of our options class.
You might want to move the connection string into the “ConnectionStrings” section. That can also be done, quite easily: Please note: Do not have connection strings that points to your live database in your version control. That’s an easy way to get in the news.
By using the connection string section in the appsettings.json, we can configure our Azure App Services with connection strings more easily.
First, we bind the settings from the “azureSettings” section, then we set the connection string from the connection strings section. That’s it really.
Azure Functions
Azure functions are a bit different in the way it handles settings. It uses environment variables instead of configuration files. However, in a local dev environment, it does have a configuration file: local.settings.json. And it might look something like this:
Nothing radical. All we have to look at, is the Values section. This is a simple key-value object. Nothing special. So, we add the configurations for the Azure storage example at it looks like this:
In our console application, in this example at least, we don’t want any configuration files. We want all our configurations to come from the argument list.
First up, we need to parse the argument list. This code is not pretty, but bear with me:
private static IReadOnlyDictionary<string,string> ParseArgs(string[] args)
{
    var values = new Dictionary<string, string>();

    for (int i = 0; i < args.Length - 1; i++)
    {
        var key = args[i];
        var value = args[i + 1];
        if (key.StartsWith('-'))
        {
            key = key.Substring(1);
            values.Add(key, value);
        }
    }

    return values;
}
We then need to pass those values into the configuration code:
As the previous examples show, we can store and retrieve our application configurations differently. But our services stay the same. The same goes for UWP applications.
But, instead of relying on environment variables, setting up appsettings.json or adding command line arguments. I will demonstrate how to read configurations from an ini file and use the values in our services.
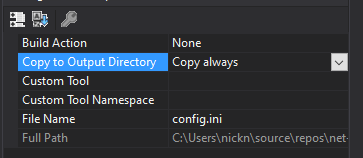
First up: The config.ini file.
Create a file called config.ini. It is important, that this file is always being copied to the output directory:
Visual Studio file properties for the config.ini file with the “Copy to Output Directory” property set to “Copy always”
Then, in the App.Services.cs file, we will load and parse the file: (I know, this logic should be put elsewhere, “Separation of concern” and all that. But for this example, I’m keeping it simple.)
private IReadOnlyDictionary<string, string> LoadSettings()
{
    var lines = File.ReadAllLines("./config.ini");
    var values = lines.Select(l => l.Split("=")).ToDictionary(k => k[0], v => v[1]);

    return values;
}
And that’s it. Four applications, four different types of managing configurations, 3 services all configured the same way.
TL;DR
Application settings, as the name implies, are application specific. You may have services shared across different application types. But the way each application handles configurations may differ from one another.
So, instead of letting the libraries do all the configurations and letting the guess what kind of application we’re running. We will let the application do the configuration for us, and then pass those down into our services in a standardized way.
Read more
If you haven’t already, please take a look at the other posts in this series:
When building a service that has a dependency to a second, third or even fourth service. A sensible decision would be to just create new instances of those dependencies as you need them. It makes sense. I need a price calculation service therefore I create one and use it.
It makes sense to do so. Only create what you need when you need it. But what will happen if you need the price calculation service multiple places. You will end up creating multiple instances of the same service, and that could impact performance in a bad way. One way of handling this, is to add the dependent service as a parameter to the constructor and let someone else handle the creation of the dependent service. That is called Inversion of Control or IoC.
This post is not about IoC. But about how we can use that to our benefit by moving the creation and disposal of services away from our services into an IoC container. Luckily for us, such a container is baked into ASP.NET Core.
I will in this post show how to easily use IoC and register multiple services at once and use the same registration method in different .NET Core application types. From ASP.NET and Azure Functions to Console and Universal Windows applications. And yes, it is possible and quite powerful.
The Visual Studio Solution
To illustrate what we’re doing, I’ll have a solution with 7 projects:
IoCTest.Integrations.Email (.NET Standard library)
IocTest.Infrastructure.DAL (.NET standard library)
IoCTest.Integrations.AzureStorage (.NET Standard library)
It might seem like a lot, but you’ll see, once you’ve done it once, you’ll be able to do them all. In an extraordinary short time. The solution here, took me about an hour and a half to setup. Yes, it has no business logic, but it does have a lot of moving parts. 1 hour 30 minutes from zero to 7 projects all referenced, IoC initialized, setup and ready to go.
The source code for this post can be found on GitHub right here:
With ASP.NET Core came a build-in inversion of control container wrapped in a service called WebHostBuilder. This was meant for ASP.NET and ASP.NET only. But with .NET Core 3, came the new GenericHostBuilder. With this update came the ability to take many of the features available to ASP.NET and use them in new application types. It even makes it possible to mix and match. Hosting a rest api in a console app. Having console features in a web app, even Windows services. But that is out of scope for this series. For now, we will focus on one thing: Inversion of Control.
Just a side note: You can get the pattern I present her to work from a .NET Framework application using a DI like Ninject, Castle Windsor or LightInject. It’s a bit more cumbersome, and I won’t get into that since .NET Framework has a foot in its grave already.
Registering the services
Using the build-in service locator we need to register the services. That is done using the IServiceCollection interface from the host builder.
In an ASP.NET Core application, this is done in the Startup.cs class in the method “RegisterServices”. And it looks a lot like this:
IServiceCollection services = new ServiceCollection();

services.AddScoped<IEmailClient, EmailClient>();
As I wrote earlier, the inversion of control container is native to ASP.NET Core but we can make use of it in difference application types as well. I will demonstrate that later on.
This way of registering services is easy. Each application registers the services it needs and we are all happy. Or are we? If we look at the EmailClient, we can see it has two dependencies:
This means, that each application must register each of those services as well. And when the dependencies change, and it will in part 3 of this series, we will have to update each application and essentially copy and pasting code, creating duplicate code and that is bad. See part 1 on that.
What if we could make our email library do the work for us? The library ought to know about all its services and their dependencies? I think that’s a fair assumption.
When I build libraries like this, I like to make a Configurator class. What this class does is actually the same as you would in the above examples.
All you need to do is install the following NuGet package:
However, if your library has a nuget package installed, that already has this dependency. You don’t need to install this one. That is the case with the DAL library, where the Entity Framework Core package has a dependency on this package already.
The configurator class has a static method, an extension method for IServiceCollection, and looks a bit like this.
Note the naming. The method is named after what it does. This one adds all the services needed by the email library. If your library has multiple, independent services, you could add more of these extension methods. That’s up to you.
Now all we have to do in our startup.cs and their equivalents are this:
services.AddEmailServices();
And voilà, now the email services can evolve by themselves, all without breaking your applications or forcing you to update all the registrations.
I have come across multiple solutions where this is the case, been involved in quite a few of them myself before learning this “trick”. Which is why I choose to write about it here.
I know that it creates a dependency on a NuGet package on all our libraries, but I find the trade-off worth the while. Since we have separated the concerns into separate libraries, each with their own setup method, we have less duplicated code and decreased complexity. And we can reuse the same setup logic across several types of applications as well.
Feel free to go through the repo above to get into details on how I’ve implemented this.
Please bear in mind, that this is only for demonstration, not for production. The code builds and runs, but it needs a lot of configuration which I’ll dig into in the next part, and still has no business logic.
For now, let’s wire up the inversion of control containers for each of our applications:
Setting up Inversion of Control
As you know by now, ASP.NET Core already comes with an IoC container baked in so I won’t get into details on that. But I will take you through the other application types.
Console application
If you open up the IoCTest.Web.Rest project, you’ll see a Program.cs file. At first glance, it might seem odd that a web application needs a Program class just like a Console application. The reason is that an ASP.NET Core application, first and foremost, is a console app.
If you open the bin folder, you’ll see that is has created two files: IoCTest.Web.Rest.dll and IoCTest.Web.Rest.exe. The dll contains the code that we need to actually run the application. The exe file is the self-hosted application. A portable webserver that serves your application, just like IIS would do. If you run the .exe file, you’ll see something like this:
Example of an ASP.NET Core application running as a console application.
You can now go to http://localhost:5000 or https://localhost:5001. All this without setting up a local IIS or starting up an IIS Express instance.
This, to me, demonstrates perfectly, that an ASP.NET Core application is just a simple console application, with some services loaded and executed. And that opens for a whole lot of awesome.
If you think about it. If you can load up a web server from a console app. What kind of other stuff can you load up as well?
So, let’s look at our IoCTest.Applications.CLI project.
It has two files: HostedConsoleService, which we’ll look at later, and a Program file, pretty standard for a console application.
If you look at the Program.cs file from both the ASP.NET application and the console application side by side, you’ll notice a couple of things:
They both call Microsoft.Extensions.Hosting.Host.CreateDefaultBuilder(args)
They both configure services, (the web app through the startup class)
And they both call a Run method.
When you create a new .NET Core console app, you will not have access to the host builder. You will, in fact, have access only to a bare minimum of services for a .NET Core application. We need to install two NuGet packages to get that:
Microsoft.Extensions.Hosting
Microsoft.Extensions.Hosting.Abstractions
This will give us access to the generic host builder and the IHostedService interface, which I will dig into later.
All we need to do is to change our Main method a bit:
You’ll notice that I’ve change the signature a bit. With .NET Core 2.0 we finally got support for native async console applications. Which we need since our application host is going to run asynchronously.
The second thing you’ll see, is that I call Host.CreateDefaultBuilder(), exactly as I do in the ASP.NET Core application.
It then deviates a bit.
Instead of ConfigureWebHostDefaults, we call ConfigureServices. And instead of calling .Build().Run(), we call RunConsoleAsync().
The ConfigureServices method is our stand-in for the startup class. This is where we’ll register all our services. Including, the most important one: The IHostedService implementation HostedConsoleService.
Let’s dig into that one.
internal class HostedConsoleService : IHostedService
{
    public Task StartAsync(CancellationToken cancellationToken)
    {
        return Task.CompletedTask;
    }

    public Task StopAsync(CancellationToken cancellationToken)
    {
        return Task.CompletedTask;
    }
}
Nothing. Absolutely nothing. But it’s still very important.
In a normal console application, the Main method is our entry point. This is where we instantiate and run everything. But not in this case. In this case, we register our services and starts a generic host from our Main method. But our host is no good host if it has no services to host. Hence the IHostedService. This class is now our entry point. We can create a constructor and add all the services we need like this:
And then we can use the IEmailClient service. Of course, we need to register it first, but you get the gist.
A note: Normally a console app closes automatically after completion. Not in this case. We need to tell our application to stop. To do so, just inject the Microsoft.Extensions.Hosting.IHost interface and call the host.StopAsync() method when you need to stop the application. Otherwise it keeps running until ctrl+c is pressed, or the console is closed.
A second note: In a web context, a scoped service is created once in the beginning of a request and reused until the request ends. In console applications and UWP applications, you need to manage the scopes yourself. I will not dive into this here, as it is out of scope for this series.
Azure Functions
From the very beginning, Azure Functions was build almost the same way as basic console applications: A static class with a static method with your code. It’s all good for small tasks. But if you have a set of methods doing different tasks on the same libraries it quickly gets complicated when you have to initialize every single service one by one, for every dependent service as well. And doing it for multiple Azure Functions. There was some rudimentary dependency injection, but only for a few known services and definitely not for custom services.
This has changed with .NET Core 3 and the Azure Functions v3 API. Now we can have a startup.cs and use the approach described earlier on.
All we need is two NuGet packages:
Microsoft.Azure.Functions.Extensions
Microsoft.Extensions.DependencyInjection
The latter, I find, is self-explanatory. The former, is what makes magic possible. It exposes an abstract class called, Microsoft.Azure.Functions.Extensions.DependencyInjection.FunctionsStartup.
All we have to do now, is to create a new class, Startup.cs, inherit from this class and implement the Configure method.
Oh, and one thing: We need to tell the runtime that we have a startup class, otherwise it won’t use it. To do that, we need to add this to our class file:
The FunctionsStartupAttribute is found in the namespace Microsoft.Azure.Functions.Extensions.DependencyInjection.
It is important, that this line of code is located outside of the namespace as it contains information that is needed by the runtime during assembly load.
All it does, is telling the runtime to create an instance of the class registered and start the application from here.
The Configure method, gives us access to an instance of IFunctionsHostBuilder. At the moment, it doesn’t contain much, but it do contain a single property: Microsoft.Extensions.DependencyInjection.IServiceCollection Services { get; }.
And you will notice, that the IServiceCollection matches the one we have been using to register all our services. So now, we can do something like this:
public override void Configure(IFunctionsHostBuilder builder)
{
    var services = builder.Services;

    services.AddEmailServices();
    services.AddDatabaseAccess();
    services.AddStorage();
}
Brilliant! But how can we inject these fine services into our static Function class. Easy: First remove the “abstract” keyword from the class and method definition. Add a constructor that takes the services you want to use, and the use them in your function:
public class Function1
{
    private readonly IEmailClient emailClient;

    public Function1(IEmailClient emailClient)
    {
        this.emailClient = emailClient;
    }

    [FunctionName("Function1")]
    public Task Run([TimerTrigger("0 */5 * * * *", RunOnStartup = true)]TimerInfo myTimer, ILogger log)
    {
        return emailClient.SendEmailAsync("[email protected]", "[email protected]", "Sent from a Azure Function using IoC", new { text = "This is so awesome!" });
    }
}
Simple as that.
As you can see, three different application types, all using the same service registration logic. And now for something a bit more complicated:
Universal Windows Application
I have little to none experience with Universal Windows Applications, or UWP Apps. I did a bit of WPF development back in the day, but it has definitely been a long time since.
This example is merely to demonstrate how to use the same methodology as above, but in a completely different environment. UWP apps are not console applications. They work in a completely different way compared to web applications and are not service based as Azure Functions. I will not dig into scope management as I’m too unfamiliar with the API’s to do so. But I will show how you could build inversion of control into you UWP app and reuse the same services as your other applications. Without any hazzle, well maybe a little, let’s see:
First you need to install three NuGet packages:
Microsoft.Extensions.DependencyInjection
Autofac
Autofac.Extensions.DependencyInjection
Since UWP’s, as of writing, does not have inversion of control natively, we need to use an external IoC container. In this case, Autofac. And you’ll see why, later.
As you might have noticed, I like to separate things into separate parts by concern. The same goes for this next part.
Any application has an entry point. UWP apps has one called App.xaml and a corresponding App.xaml.cs. We want to extend this a bit. So, first things first: Create a new file called App.Services.cs. In this file, you should create a single partial class called “App”:
public partial class App
{

}
In here we’ll add a public static property that contains the IoC container and a method called ConfigureServices().
In here, we’ll setup Autofac and register our services:
public partial class App
{
    public static IContainer ServiceContainer { get; private set; }
    private void ConfigureServices()
    {
        var containerBuilder = new ContainerBuilder();
        IServiceCollection services = new ServiceCollection();

        services.AddScoped<IEmailClient, EmailClient>();

        this.ConfigureServices(services);

        containerBuilder.Populate(services);

        ServiceContainer = containerBuilder.Build();
    }
    private void ConfigureServices(IServiceCollection services)
    {
        services.AddEmailServices();
        services.AddDatabaseAccess();
        services.AddStorage();
    }
}
That’s it really. Remember to include these namespaces: Autofac, Autofac.Extensions.DependencyInjection and Microsoft.Extensions.DependencyInjection.
Now we only need to call our “ConfigureServices” method from the App class and we are golden. For this example, I do it from the constructor. You might want to do it somewhere else to better manage resources when going back and forth between pages and the suspended state. You might know this a lot better than I.
To get one of your services, all you have to do is call the Resolve<> method on the App.ServiceContainer property:
public sealed partial class MainPage : Page
{
    public MainPage()
    {
        var emailClient = App.ServiceContainer.Resolve<IEmailClient>();

        this.InitializeComponent();
    }
}
You’ll notice that we don’t have dependencies in the constructor. At the time of writing, it is very complicated to get that working, so this method will do for now.
You can read more about Autofac and how to register and resolve services here:
In the next part, I will dig into how to use all of this for configuration. Allowing the same services to be configured from completely different configuration sources. It is almost scary how easy and reusable it is.
TL;DR
It is very easy to build a large number of small services and reuse these services across different kinds of .NET Core applications. By using IoC intelligently.
It is also easy to maintain all these small services, registering them, updating, adding and removing them. Without breaking all your applications with one standardized method.
It might take a bit of configuration for some of the application types, but it is all “set and forget”. Have you done it once, you will never have to think about it ever again.
Read more
If you haven’t already, please take a look at the other posts in this series:
Note, this
series is very theoretical, and this first part especially, and might be for
less experienced developers, but there should be something for everyone.
There are
many ways to build an application, many right ways to build one and many wrong
ways. I’m not the one to say the way you build your applications are wrong. I
might be wrong; I might be right and so can you. It all depends on how you work
best in your organization and under your circumstances.
With this
post, I’m going to describe what I think is the best approach to application
development anno 2020. Namely splitting up your code into separate blocks and
services.
Previously,
when I was less experienced as I am today, I used to build applications in
large chunks. It’s easy. I need an application that takes X and splits
it into A, B and C. A is going into a database, B and C is
going to different external services.
Large methods
So, my
application would have one large method, Save(X). That method would handle
everything: Open a connection to the database, save A, close the database
connection. Then, open a connection to External Service 1, post B, close the
connection. And finally open a connection to External Service 2, post C and
then close the connection.
It’s quite
simple. Everything is there. My method does exactly as is advertised, (sort
of), and it does get the job done.
Then, the
next day, I need another method to only send B to External Service 1. Well,
that’s easy. Open a connection to the service, post B and then close the
connection again. Easy. Everything is fine, everything is working as expected
and everyone is happy.
But one
day, External Service 1, updates their API. There are new URL’s and a new
authentication model. Everything in my application breaks. Who can fix it? I
might, but it’s been a while since I’ve worked on that application, so my
memory is a bit rusty. So, I try to remember all the places where I call the
service and update to the new API. I might miss a few places, but those places
are the ones not easily tested, so errors might only occur after a while. Had
one of my colleagues gotten the job, the chance of failure would be very high!
This pattern of copying code from one place to another, is called duplicate code. In my experience, duplicate code occurs when you just need to add a feature or fix an error, quickly. Or, it might happen when the developer lacks the experience to foresee problems ahead of time. The latter certainly was the case for me for some time. Later it was the former.
If you need to copy and paste code, you’re doing something wrong.
Søren Spelling Lund, CPO, uCommerce
I’ve heard this quote many years ago, but it has stuck with me ever since, and I try to do my best not to copy and paste code. Well, we all copy and paste from Stack Overflow, but you know what I mean.
One of the
problems with code duplication, besides the difficult maintainability, is that
it, more often than not, results in huge methods and classes that attempts to
do everything at once. Take our Save(X) example above. It does three things at
once. It makes sense, since it has to split X into separate parts and send
those parts to different services. But it has way too much responsibility. It
has the responsibility to package and serialize the data into the formats each
of the services requires. It also has the responsibility to open and close
connections to each service and it has the responsibility to handle errors
returned from each service. And most importantly, none of it can be reused. It
has all that responsibility, and can only use it for that very specific task
that is to save X.
Save(X)
might look something like this:
public void Save(X){
    // Split X into A, B and C
    // Open the database connection
    // Map A into a database entity
    // Close the database connection

    // Open a connection to External Service 1
    // Serialize B into json
    // Send json to External Service 1
    // Close the connection to External Service 1

    // Open a connection to External Service 2
    // Serialize C into XML
    // Send XML to External Service 2
    // Close the connection to External Service 2
}
What we
need, is to relieve Save(X) of some of its responsibilities. Save(X) should
only have one responsibility: Save X.
This is
called Separation of Concern.
We need to
identify every small part of the application and separate them into small
reusable snippets. Where each snippet has one responsibility. And only one.
Again,
let’s take our Save(X) example from above.
It can be
split into 3 parts, which again can be split into, at least, three parts each.
Separation of Concern
What we need to do, is to separate everything into small, easily reusable and maintainable snippets with as few responsibilities as possible. This is called Separation of Concern.
Database
Save(X),
needs to store data into the database. We can separate that logic into a
library that does that. The library has three responsibilities: Manage database
connections, package/transform/serialize the data and store it in the database.
The first
part is building a class that only has one concern: Database connection, let’s
call it DatabaseConnection. It has two methods: Open () and Close (). This is a
very simplistic setup and mostly theoretic, bear with me on this.
It might look
like this:
class DatabaseConnection
{
    public OpenDatabaseConnection Open()
    {
        // Open the connection.
    }

    public void Close()
    {
        // Close the connection.
    }
}
Open ()
returns a database connection that can be used to send data to/from the
database. Our Save(X) could just use this and be over with it. Save(X) no
longer has the responsibility of knowing how to open a database connection or
how to close it. But it still has the responsibility of knowing how the data is
formatted and sent to the database.
Therefore,
we need another class: UnitOfWork, (again, simplistic and theoretic. More
details in upcoming posts).
This class
has the responsibility to send data through an open database connection with a
method called SaveData(). And since we’ve just made a class with the sole
responsibility of maintaining the database connection, our UnitOfWork class can
utilize this class. If we choose to make a new UnitOfWork, we can make use of
the same database context class and not have any duplicate code between our two
unit of works, other than calls to the Open() and Close() methods.
Our
UnitOfWork class could look like this:
public class UnitOfWork
{
    private readonly DatabaseConnection databaseConnection;
    public UnitOfWork(DatabaseConnection databaseConnection)
    {
        this.databaseConnection = databaseConnection;
    }

    public void SaveData(string tableName, object data)
    {
        this.databaseConnection.Open();
        // Save the data
        this.databaseConnection.Close();
    }
}
We could add a third layer, called Repository, (I know, using Entity Framework, NHibernate and the like, the repository pattern is redundant). What this class does is package the data and send it to the database. And since we’ve just made a class that has the responsibility of sending data to the database, our Repository only has one concern: Package the data. And then send that data to our UnitOfWork:
public class Repository
{
    private readonly UnitOfWork unitOfWork;
    public Repository(UnitOfWork unitOfWork)
    {
        this.unitOfWork = unitOfWork;
    }

	public void SaveA(AModel data)
	{
		// Map A into a database entity.

		this.unitOfWork.SaveData("dto.A", mappedData);
	}
}
We have now separated the concern of managing the database connection, mapping to a database entity and saving that entity to the database, away from our Save(X) method, it now looks like this:
public void Save(X){
	// Split X into A, B and C

	Repository.SaveA(A);

	// Open a connection to External Service 1
	// Serialize B into json
	// Send json to External Service 1
	// Close the connection to External Service 1

	// Open a connection to External Service 2
	// Serialize C into XML
	// Send XML to External Service 2
	// Close the connection to External Service 2
}
Much simpler, and we can now reuse Repository.SaveA() multiple places without thinking about changes to the database connection, database schema or future development.
Service clients
As with the
database abstraction we did above, we can also split our service clients into
separate parts with single responsibilities.
But first,
lets break it down a bit.
We have,
again, three responsibilities: Manage a connection to a service, serialize data
and send data.
I feel lazy,
so for the first part we’ll be using a build-in service called System.Net.Http.HttpClient.
This service / client manages everything related to HTTP requests. Hence the
name HttpClient. It handles opening and closing connections, so we don’t have
to think about that. For now.
But we still
need to serialize data before we can send it through the HttpClient.
We know we
have to serialize at least two different kinds of data into, at least, two
different kinds of string data, (JSON and XML). Let’s start by defining a
reusable interface that does just that:
public interface IDataSerializer<TModel>
{
    System.Net.Http.HttpContent Serialize(TModel model);
}
This interface
describes a service that converts a model of type TModel into an instance of
HttpContent.
We can then
create two services:
public class BSerializer : IDataSerializer<BModel>
{
    public System.Net.Http.HttpContent Serialize(BModel model)
    {
        /// serialize to json. ... omitted for brevity
        return new System.Net.Http.StringContent(jsonString, System.Text.Encoding.UTF8, "application/json");
    }
}

public class CSerializer : IDataSerializer<CModel>
{
    public System.Net.Http.HttpContent Serialize(CModel model)
    {
        /// serialize to xml. ... omitted for brevity
        return new System.Net.Http.StringContent(jsonString, System.Text.Encoding.UTF8, "text/xml");
    }
}
These two
services each has one responsibity: Convert data to a format that can be sent
to the service. Please note, these are very simplified examples.
We now
handle the serialization part. What we need is a service that can send that
data to our service endpoints. I like to call a service like that something
like ServiceClient.
Our
ServiceClient has two dependencies: HttpClient and an instance of
IDataSerializer<TModel>. It also has a method called SendData that takes
an instance of TModel and sends it through our HttpClient.
A such client
could look something this:
class ServiceClient<TModel>
{
    private readonly System.Net.Http.HttpClient httpClient;
    private readonly IDataSerializer<TModel> serializer;

    public ServiceClient(
        System.Net.Http.HttpClient httpClient,
        IDataSerializer<TModel> serializer)
    {
        this.httpClient = httpClient;
        this.serializer = serializer;
    }

    public System.Threading.Tasks.Task SendDataAsync(TModel model){
        var serializedContent = this.serializer.Serialize(model);
        return this.httpClient.PostAsync("path to service", serializedContent);
    }
}
Again, very
simplified. This client only handles a single model type and can only do HTTP
Post requests. But then again, it’s for illustrative purpose only.
Please
note, managing the HttpClient happens elsewhere. The serialization logic has
also been moved elsewhere. The only thing this class does, is sending
serialized data through the HttpClient.
Our Save(X)
method above would then look something like this:
As you can
see, much simpler. The only responsibility this class now has, is to split X
into A, B and C. Saving A to the database is handle elsewhere. B and C is being
handled elsewhere also. Some of the logic that handles B and C is reused. And
it’s extensible. We can, quite simple, add a new service that sends C data as a
binary stream by only creating a new IDataSerializer class.
The next
part will be much more in dept into how I would organize and build libraries in
a .NET Core application. Including how to wire up services like the ones described
in this post and use dependency injection efficiently and reusable across applications.
TL;DR
Splitting code into small libraries, small classes and small methods. Has a lot of benefits:
1: Easier to maintain
It’s easier
to maintain 10-20 lines of code doing one thing, than it is to sieve through
100s of lines of code that does everything to fix a bug.
It’s also easier to make changes without impacting the entire application. You can mark methods obsolete; you can change dependencies, interfaces and schemas without impact.
2: Reusability
When
splitting your application into smaller pieces, you can reuse those pieces
multiple places. And fixing an error in one of those pieces, means fixing it
everywhere.
Reusability
also opens up for unit testing. Having separated everything into separate
parts, you can mock-up all dependencies and only test essential code.
You can even reuse your code across different applications, say an ASP.NET Core application and an Azure Function. Both can use the same library. And changes in that library will not impact either of them.
3: Scalability
By separating everything, you can build more efficient code, reducing memory footprint and CPU usage. You can implement caching strategies and manage disposables within each library / module / class / method.
4: Cons
By
splitting everything into smaller pieces, one must be aware of changing the
interfaces and contracts. Since the code you are changing can be used places
you don’t know about.
A method
that does one thing, must keep doing that one thing. All code that calls that
method, expects it to do that one thing. Changing it to do another thing, is
unexpected behaviour and might result in errors. Such changes must be made in a
different method / class marking the old one obsolete if needed.
The
developer must think of everything that depends on that library as external. It
might be the developer him/her self that builds those applications, but after 4
weeks, he/she is definitely a different developer.
I always try to find an excuse to code, I just love doing it. It rarely ends in a real life usable product, but I’m having a blast doing it.
For my latest project, I thought I would bring you around, just to get back into the blogging game, but also to keep my self on a schedule to, at least try to finalize this project.
Description
It’s no secret, my blog runs on WordPress, it has done so since 2007. I have tried, many times to move to Umbraco, but I never really got there, so here we are.
This project, is a way for me to start that transition. I want to move all public content away from the CMS, into a standalone application based on ASP.NET Core. This way, I will be able to isolate my WordPress backend and have a greater control over my frontend.
I will also like be able to try switching to Umbraco Headless or a full, local, Umbraco install without changing the frontend or needing to rebuild the front-end completely.
I usually use Visual Studio for my programming, but I will try to make this post as “cross platform” as possible.
My project names are all prefixed with NDesoft, feel free to call yours what you want.
I will also use my own WordPress API endpoint, feel free to use that as well. Everything is cached by Cloudflare, so go nuts.
Resources / Documentation
I am using the following resources to help me along in this endeavor:
And now, our solution and projects are up and running and we can start coding.
Interfaces
ASP.NET Core has native dependency injection, and since we are building a highly decoupled platform it makes sense to utilize that. So let’s start by adding a ton of interfaces. These will just be the bare minimum for this post, more will come.
In the NDesoft.Wrapper project, we’ll add a folder called “Interfaces” and under that another called “Helpers”.
In the Helpers folder, we’ll create to interfaces, (One file per interface):
IRequestManager
This interface manages requests to the Rest API and deserializes the responds, I might add an interface for the deserialization, but for now it’s handled by this manager.
This interface helps us handle URL parameters in a shared way. No copy/pasting anything.
public interface IUrlParameterHelper
{
    string ConvertToUrlParameters(object parameters);
}
In the “Interfaces”-folder, we’ll create two new interfaces:
IPosts
This is an interface that handles everything related to blog posts. It has nothing to do with authors, tags, categories, media, comments, pages and so on, only posts.
Please note the “PostModel”-class, this will be implemented in a bit.
The name might change, I do not like the name, but for now it’s IClient. It’s the main entry point handling almost everything.
public interface IClient
{
    IPosts Posts { get; }
}
Classes
Now we have the basic interfaces going, let’s implement them.
First of we need a class that represents a single blog post:
NDesoft.Wrapper
PostModel
Place this class in a folder, in the NDesoft.Wrapper project called “Models”.
public class PostModel
{
    public string Id { get; set; }
    public DateTime Date { get; set; }
    public DateTime Modified { get; set; }
    public string Slug { get; set; }
    public string Title { get; set; }
    public string Content { get; set; }
    public string Excerpt { get; set; }
    public string AuthorId { get; set; }
    public string FeaturedMediaId { get; set; }
    public bool IsSticky { get; set; }
    public IEnumerable<string> CategoryIds { get; set; }
    public IEnumerable<string> TagIds { get; set; }
}
This class is based off of the response from the following request for a single post:
GET https://ndesoft.dk/wp-json/wp/v2/posts/873
The properties contains, what I think is, the minimum required number of properties to display a blog post. You might want more or less.
You might want to add a reference to this class in the IPosts interface.
RequestManager
In NDesoft.Wrapper create a folder called Helpers. In here, create a class called RequestManager:
public class RequestManager : IRequestManager
{
    public static readonly HttpClient httpClient = new HttpClient();
    private readonly string baseUrl;
    private readonly IUrlParameterHelper urlParameterHelper;

    public RequestManager(string baseUrl, IUrlParameterHelper urlParameterHelper)
    {
        this.baseUrl = baseUrl;
        this.urlParameterHelper = urlParameterHelper;
    }

    public virtual async Task<TResult> Get<TResult>(string url, CancellationToken cancellationToken, object parameters = default)
    {
        var fullUrl = this.GetFullUrl(url, parameters);

        var response = await httpClient.GetAsync(fullUrl, cancellationToken).ConfigureAwait(false);
        response.EnsureSuccessStatusCode();

        var bodyContent = await response.Content.ReadAsStringAsync().ConfigureAwait(false);

        var result = JsonConvert.DeserializeObject<TResult>(bodyContent);
        return result;
    }

    protected virtual string GetFullUrl(string url, object parameters = default)
    {
        var parameterString = this.urlParameterHelper.ConvertToUrlParameters(parameters);
        return $"{baseUrl}{url}{parameterString}";
}
}
Worth noting: The constructor takes a string as first parameter. It contains the base URL of the Rest API. The value is, later on, set using app settings. However, I would like to not add it as a parameter, since it adds to the complexity of setting up the dependency injector.
Also noteworthy, this class has a static readonly HttpClient. This way we always use the same HttpClient for all requests. I do know about RestSharp and the like, but I prefer HttpClient as I thinks it’s easier to use.
I have a habit to always pass a Cancellation token into every async method that supports it. To me it makes sense because if a user aborts a request, every subrequest I make on my site will be aborted as well releasing resources.
It might be beneficial to add some caching here to reduce response times and load on the source server.
UrlParameterHelper
Next to the RequestManager, add a class called “UrlParameterHelper”:
public class UrlParameterHelper : IUrlParameterHelper
{
    public string ConvertToUrlParameters(object parameters)
    {
        if (parameters == default)
        {
            return string.Empty;
        }

        var type = parameters.GetType();
        var properties = type.GetProperties();
        var urlBuilder = new StringBuilder();

        if (properties.Any())
        {
            urlBuilder.Append("?");
            string joinedParams = GetParameterString(parameters, properties);
            urlBuilder.Append(joinedParams);
        }

        return urlBuilder.ToString();
    }

    private static string GetParameterString(object parameters, PropertyInfo[] properties)
    {
        var urlParams = new List<string>(properties.Count());
        foreach (var property in properties)
        {
            var value = property.GetValue(parameters);
            if (value != null)
            {
                var stringValue = value.ToString();
                if (string.IsNullOrWhiteSpace(stringValue) == false)
                {
                    var encodedValue = HttpUtility.UrlEncode(stringValue);
                    var urlParam = $"{property.Name}={encodedValue}";
urlParams.Add(urlParam);
}
}
}
var parameterString = string.Join("&", urlParams.ToArray());
    return parameterString;
}
This class is used to help converting an object to url parameters, making it easier to create url’s with objects rather than string manipulation.
In the future, this class might be extended to handle number and datetime formatting better than it does now, as well as flattening nested properties.
Client
And now, the last class in the NDesoft.Wrapper project, before moving on to the WordPress specific classes. This class should be located in the root of the project.
public class Client : IClient
{
    public Client(
        IRequestManager requestManager,
        IPosts posts)
    {
        this.RequestManager = requestManager;
        Posts = posts;
    }

    protected IRequestManager RequestManager { get; }
    public IPosts Posts { get; }
}
There’s nothing much to this class at the moment, but we will add more in a future post.
NDesoft.Wrapper.WordPress
Now we move on to some of the WordPress specific implementations.
Models
This is not a class but a folder, we need to create a lot of classes that represents the json returned from the WordPress Rest API, and instead of me posting all those classes I’ll tell you how to generate all those classes.
In the root of the project, add a class called Posts:
public class Posts : IPosts
{
    private const string BaseUrl = "/wp/v2/posts";
    private readonly IRequestManager requestManager;

    public Posts(IRequestManager requestManager)
    {
        this.requestManager = requestManager;
    }

    public async Task<IEnumerable<PostModel>> GetPosts(int currentPage = 1, int? pageSize = null, CancellationToken cancellationToken = default)
    {
        var parameters = new
        {
            page = currentPage,
            per_page = pageSize
        };

        var response = await requestManager.Get<IEnumerable<Post>>(BaseUrl, cancellationToken, parameters).ConfigureAwait(false);
        return Mapper.Map<IEnumerable<PostModel>>(response);
    }
}
Some background here: The method “GetPosts” loads all posts from the API by calling this URL:
GET https://ndesoft.dk/wp-json/wp/v2/posts
However, loading all posts at the same time would be overkill and slow down response times and over time only become slower. So, we need to add some paging parameters to the URL.
Speaking of AutoMapper, we need some configuration to map the weird WordPress models the more leaner PostModel class. To do that, we need an AutoMapper profile.
Create a folder called “AutoMapperProfiles” and add a class called PostProfile:
public class PostProfile : Profile
{
    public PostProfile()
    {
        CreateMap<Post, PostModel>()
            .ForMember(dest => dest.Date, m => m.MapFrom(src => src.date_gmt))
            .ForMember(dest => dest.Modified, m => m.MapFrom(src => src.modified_gmt))
            .ForMember(dest => dest.Title, m => m.MapFrom(src => src.title.rendered))
            .ForMember(dest => dest.Content, m => m.MapFrom(src => src.content.rendered))
            .ForMember(dest => dest.Excerpt, m => m.MapFrom(src => src.excerpt))
            .ForMember(dest => dest.AuthorId, m => m.MapFrom(src => src.author))
            .ForMember(dest => dest.FeaturedMediaId, m => m.MapFrom(src => src.featured_media))
            .ForMember(dest => dest.IsSticky, m => m.MapFrom(src => src.sticky))
            .ForMember(dest => dest.CategoryIds, m => m.MapFrom(src => src.categories))
            .ForMember(dest => dest.TagIds, m => m.MapFrom(src => src.tags));
    }
}
Again, nothing special here. All we do is we flatten out some of the weird constructs of the WordPress json and maps everything to a more lean model.
Web
Now we have setup everything needed to access the WordPress API and have a solid base to build on. All we need to do now is wire everything up in the web project.
Configure AutoMapper
First things first, we need to configure AutoMapper. Open up the Startup-class and add the following method at the bottom of the class:
All we do here is adding AutoMapper to our services, and adds our PostProfile to the AutoMapper collection.
Setting up the Dependency Injector
Next up, adding our services to the Dependency Injector. Again in the Startup-class add the following method to the bottom of the class
private void SetupWrappers(IServiceCollection services)
{
    services.AddTransient<IUrlParameterHelper, UrlParameterHelper>();
    var baseUrl = Configuration["WrapperConfig:BaseUrl"];
    services.AddTransient<IRequestManager, RequestManager>((provider) => new RequestManager(baseUrl, provider.GetRequiredService<IUrlParameterHelper>()));
    services.AddTransient<IClient, Client>();

    // Service specifics:
    services.AddTransient<IPosts, Posts>();
}
All we do here is telling the DI, what services we have, and where to find their implementations. Note that everything uses the NDesoft.Wrapper classes, but only Posts uses the NDesoft.Wrapper.WordPress classes.
Before we’re done here, we need to add the following to the appsettings.json-file:
Wouldn’t it be fun, if you could simply call one method on an IPublishedContent, and get any property as the right type, always, without parsing or converting the data, passing any type-parameter or calling different methods? Wouldn’t it be cool if said method knew that a rich text editor property is always an IHtmlString and a content picker is an IPublishedContent rather than a string or an integer? Wouldn’t it be awesome if the same method returning an IPublishedContent could return an integer or a string with no additional code other than a type parameter? And how about this method is seamlessly put on top of Umbraco without interfering with existing code, but still used in the same manner?
Would your mind be blown if I told you it is possible and how to accomplish exactly that?
Basic theory
The idea behind this “method” is basically this:
“Everytime I need a property I have to call GetPropertyValue(), add a type parameter, and a magic string with the alias of the property from which I want the value.
Nine out of ten times, that value is either a string or an int that I have to parse or convert to a different type. Why do I have to pass two values each time? And what if said property is a content picker? I can’t pass IPublishedContent as a type parameter. How should umbraco know if I want a media item or a content item?
If we could “learn” umbraco to automatically give me the right value each time, so I don’t need to know if this property is a string, a media item or a DateTime. It would make our lives a bit easier.
Let’s take a look at some code
First off, we need to know what type, each of our properties have. So we look into our doctypes and each of their properties. We need two informations: Alias and Data Type.
Then we make a small class. Nothing big, just a small one:
public abstract class DocTypeProperty
{
     protected DocTypeProperty(){}

    public string Alias {get;set;}
}
This class contains half of what we need, but it’s okay.
Please note, it’s marked as abstract, and it constructor is protected. This is because, it’s purpose is not to be instantiated directly, but to serve as a base / master class, that has to be inherited.
Then we need to store our data type. This is where magic begins:
public class DocTypeProperty<TValue>
{
    public DocTypeProperty() : base(){}
}
Is that it?! No!! As I wrote: “The magic begins”.
We have now both information needed to perform the real magic, we know the alias of the property and the type we want the data as. As the smart developer you propably are, you have noticed that I have no parameters in my constructors. That is correct. More on that later.
To instantiate our “DocTypeProperty’s” we do this:
var myProp = new DocTypeProperty<string>(){ Alias = “someAlias” }
Please take note of the variable name: “myProp”. We are going to need that later.
How and when you do this I will not tell in this post, as it’s a complete post on its own. All I can tell is T4 templating IS an option!
So now we have our alias, and the type we want to convert the value into. But we are not done yet.
As I wrote ealier, I would like this to be seamlessly integrated on top of umbraco, but I cannot just pass my DocTypeProperty into the GetPropertyValue-method as is. To do this, we need to add an implicit operator, that can “transform” our neet DocTypeProperty to an old school string containing our alias:
public static implicit operator string(DocTypeProperty prop)
{
    return prop.Alias;
}
Now we can do this:
SomeContent.GetPropertyValue<string>(myProp);
This works exactly like oldschool umbraco. No magic yet, other than the implicit operator.
Now we need to get rid of the type parameter. To do this, we need to add an extension method to IPublishedContent:
public static class PublishedContentExtensions
{
    public static TValue GetPropertyValue<TValue>(this IPublishedContent content , DocTypeProperty<TValue> property)
    {
        return content.GetPropertyValue<TValue>(property);
    }
}
This will result in an overload to the standard umbraco GetPropertyValue-method.
Now, we can do this:
SomeContent.GetPropertyValue(myProp);
See, simple. This will return the value of the property as a string. But this is great for standard data types, but what about other types like media pickers, content pickers, multiitem whatever picker? We still need to learn our DocTypeProperty-class, how to handle those types.
So we add this method to the generic DocTypeProperty:
public virtual TValue Map(IPublishedContent content)
{
    return content.GetPropertyValue<TValue>(this);
}
This is the generic / default mapper. It handles all default umbraco data types, like string, DateTime, int and so on.
Furthermore, we need to update our own GetPropertyValue()-method:
return property.Map(content);
So this is all jolly, but we still need to be able to get an IPublishedContent instead of just an integer with a node/media id. To do this, we need to override the mapper:
public class MediaPickerProperty : DocTypeProperty<IPublishedContent>
{
    public override IPublishedContent Map(IPublishedContent content)
    {
        var umbracoHelper = new UmbracoHelper(UmbracoContext.Current); // This should not be done each time we call this method. Put it outside in a cached field!
        return umbracoHelper.TypedMedia(content.GetPropertyValue<int>(this));
    }
}
Now we can make an instance of the MediaPickerProperty:
var myMediaProp = new MediaPickerProperty(){ Alias = “someMediaPicker”};
Again, note the property name. Now I have a few options:
The old fashioned:
someContent.GetPropertyValue<int>(“alias”) // returns an int.
someContent.GetPropertyValue<int>(myMediaProp) // Also returns an int.
But let’s say we have myProp registered as DocType<string>, but I would like it as an IHtmlString more than just once, but not as often as I want it as string. I don’t want to have the same property registered twice. And what if I have more properties that needs to be IHtmlString once or twice?
Well, first we need to define an IHtmlStringProperty-class, and create a mapper. Like we did with the MediaPickerProperty. The mapper however, is a bit simpler, just:
return new HtmlString(content.GetPropertyValue<string>(this));
Now I need to be able to transform my DocTypeProperty<string> into my IHtmlStringProperty.
To do this, as simple as possible, we need to add a method to the base DocTypeProperty:
public TProp As<TProp>()
    where TProp : DocTypeProperty, new()
{
    return new TProp() { Alias = this.Alias };
}
It doesn’t get any simpler than that. And now you can see why I needed to have a parameterless constructor. Otherwise, this would have been a pain in the arse.
As you can see, this is completely transparent. You can write less code. , and you don’t have to remember hundreds of aliases, and update each and everyone of them when they change. You have the alias registered once. Especially if you autogenerates the properties using T4. You can always go back to umbraco’s own GetPropertyValue. Just add a type parameter. You have complete control over what types your property values are fetched as and the code is 100% reusable!
We use this approach, including the T4 templating, in all our new projects, and we are able to put upon existing applications, without interfering with code already written.
So, it seems that my latest post has generated a lot of debate throughout the umbraco community. Thank you!
Me and my coworkers at Lund & Andresen IT (in Danish), has been using this method for a couple of months now, and we’ve found a couple of issues that I didn’t think of. But now I have taken in some input from the community as well as from my coworkers and now I am revisiting the method.
The main theme throughout the post still remains: No data access or umbraco logic in the views! The views must only display what they are being served. Nothing more, nothing less.
Where I was wrong
In the old post, I suggested that all doctypes must be mapped to a model using a mapper class. This is no longer true! The problem quickly showed it self when building a large site: With mappers, we essentially get waay to much data per view, and we generalize how data is extracted without taking in account for different circumstances. An other problem was that our controllers no longer have any work to do, other than calling a mapper and serving a view. So my MVC (Model View Controller) became a “MMVC” (Model Mapper View Controller), which was not intended.
Not that much has changed. I have only redefined the mapper roles and reinstated the controller roles:
Models
I have two types of models in mind for a basic umbraco site:
Document type model
Data model
Document type models represent real document types. They have the same inheritance structure as doctypes, meaning if a doctype is a child of a master doctype so must the representative model.
So if you have a doctype tree looking like this:
MasterDocType
TextPage
Then you will have these two models:
public class MasterDocTypeModel{}
// Please note, we inherit from the MasterDocTypeModel:
public class TextPageModel : MasterDocTypeModel {}
This way, when you add a property on the MasterDocType, you will only have to add said property on one model.
Besides containing properties mapped from a doctype, a Document Type Model, may also contain other properties, like menu items.
Data models are models that are not in any way related to doctypes. A great example is for menus. You don’t want to build an entire document type model for each item and descended items in a menu tree, when the only information you want are “Name”, “Url”, “IsActive” and “ChildNodes”.
This is where data models come in. A menu would list NavigationItemModels instead of a mixture of TextPageModel, NewsArchiveModel and so on and so forth.
Controllers
Controllers are more important than ever!
Controllers are the ones that builds models and serves them to the views. In other words, controllers build Document Type Models, and passes them to the views.
Again, I have two different types of controllers:
Master controllers
Document type controllers
Essentially, there must be a master controller for each master doctype, (a master doctype is a document type that has children), and a document type controller for each document that has a template attached.
So in my example above, we should have a master controller called MasterDocTypeController. This controller inherits from Umbraco.Web.Mvc.RenderMvcController and should not contain any actions!
The only thing these controllers must contain are two overloads of the inherited View()-method:
By creating these two methods, we are able to set values that are to be set on all models that inherits from MasterDocTypeModel.
Please note, Master controllers, can also inherit from each other, depending on the doctype structure.
A doctype controller, would then inherit from this master controller, and set values essential for said doctype and return the result from the View-method created before.
Mappers
Mappers have a much lesser role, but not less important role! Mappers are used to map data models. Data models are shared across controllers and are not doctype dependent, so we will only have a few properties to map, and can to it in a very generalized way.
Data models are inheritable, and this inheritability must be addressed in the mappers as well. It’s quite simple, so why not just do it when we build the mappers?
A mapper class is a static class with a single static method called Map().
Please note that the method is generic. This way we can call the mapper like so: Map(new SomeInheritedModel(), CurrentPage) and get SomeInheritedModel back, on which we can continue our work without type casting. This is quite useful in linq statements:
IEnumerable original = from c in someSource
                                            select NavigationItemMappers.Map(new NavigationItemModel(),CurrentPage);

// This works, as well as the one above:
IEnumerable inherited = from c in someSource
                                            select NavigationItemMappers.Map(new SomeInheritedModel(){
                                            SomeProperty = c.SomeValue
                                            },CurrentPage);

// This also works:
IEnumerable inheritedToOriginal = from c in someSource
                                                       select NavigationItemMappers.Map(new SomeInheritedModel(){
                                                       SomeProperty = c.SomeValue
                                                       },CurrentPage);

// This does not:
IEnumerable originalToInherited = from c in someSource
                                                      select NavigationItemMappers.Map(new NavigationItemModel(),CurrentPage);
As you see, same mapper, different methods and different types, meaning greater flexibility.
A not on the mappers: Mappers should not map lists or child elements! These can differ from page to page. What works on a front page might not work as well on descending pages.
To summarize
The original post is still valid!
Controllers must have greater responsibility and must be the ones to handle doctypes, not mappers!
Mappers should map only simple data models and not map lists or child elements.
Controllers must use mappers as they see fit. Controllers control the mappers, not the other way around!
MVC, it’s the sh*t. Everything is so much easier when we use MVC. So when Umbraco came out with version 5, I was super happy, because I could now use my favorite framework on my favorite CMS. Then Umbraco killed v5 and we had to go back to webforms and simple razors…
BUT, then Umbraco announced they would implement MVC in the v4 branch and port many of the MVC features from v5 to v4. I was happy, for a while, I feared v4+ would end up just like v5. Mostly because of the weird mix of MVC and webforms. But no, the mix was elegant and seamlessly and super fast, so we began using it at my work. Everything was Good!
UNTIL, we had to make some more advanced stuff, like forms. Yeah, some of our customers wants forms, I know right! So we build a couple of forms, and the problems started to appear.
Umbraco is a “Content Management System”, meaing it manages content. One of the main forces of Umbraco is its ability to handle multiple languages. And the customers know that, well most of them do. So our customers wanted to be able to localize all the texts on the forms. This is something Umbraco cannot do, not easily and definitely not pretty.
When I build MVC forms I usually have a view model or two:
public string Name { get; set; }
public DateTime Birthday { get; set; }
public int NumberOfKids { get; set; }
This is a decent model. In MVC, I would build a form in one of three ways:
I would preferably go for number one, or in some cases where I need to be in control of the markup, number two. I see no reason to use anything but EditorFor().
So from where do I get labels, display names and validation messages?
In MVC, I would get my localized texts from a Resource file, but Umbraco has no resource files, nor does it have a resource provider or some feature that allows to extract texts from the dictionary and add it to our model attributes. And I, for one, don’t think we can hand over a product being part CMS and part resource files. So how do I solve that problem.
It’s quite simple. No I am NOT going to write a resource provider for umbraco!
What I am doing is actually as simple as extending the attributes I use. So lets take the first one, Display. What I essentially want is just to pass in my dictionary key and then get a text from Umbraco. The problem here is, I cannot extend DisplayAttribute, it would have been overkill anyway, so instead I will extend the DisplayNameAttribute-class:
[AttributeUsage(AttributeTargets.Method | AttributeTargets.Property | AttributeTargets.Field | AttributeTargets.Parameter, AllowMultiple = false)]
public sealed class UmbracoDisplayAttribute : DisplayNameAttribute
{
    // This is a positional argument
    public UmbracoDisplayAttribute(string dictionaryKey) : base(dictionaryKey)
    {
    }
}
This is simple, but all we get now, is just the key to the Umbraco dictionary. I want the value. Also easy. We just need to override one property:
public override string DisplayName
{
    get
    {
        return umbraco.library.GetDictionaryItem(base.DisplayName);
    }
}
What this does, is each time I, or the framework, needs to get the DisplayName, we return the value from the dictionary. Simple as that.
So to use this new attribute, all you need to do is use this:
[UmbracoDisplay("MyDictionaryKey")]
Easy?
The other attribute (RequiredAttribute) is a bit different, it’s a validation attribute.
Please note, I don’t have a DisplayName property available, so I cannot set or override that one. What I can do instead, is setting the ErrorMessage property. But I cannot override that one either. It’s okay, I just won’t do it. Now you might think, “hey dumbass, you haven’t gotten anything from the dictionary yet!” You’re absolutely right, I haven’t.
We need to override a method called FormatErrorMessage. It looks like this:
public override string FormatErrorMessage(string name)
{
    return umbraco.library.GetDictionaryItem(base.FormatErrorMessage(name));
}
Please note, I still call the base method. This is because the base method gives us our error message (in this case, a dictionary key). If our key contained a, I think this is true, “{0}” the display name of the field would be added.
If you where to run this, you will see, that our required-attribute is not being used client side. This is because the RequiredAttribute does not implement the IClientValidatable-interface. So we must implement that:
public IEnumerable<ModelClientValidationRule> GetClientValidationRules(System.Web.Mvc.ModelMetadata metadata, ControllerContext context)
{
    // Kodus to "Chad" http://stackoverflow.com/a/9914117
    yield return new ModelClientValidationRule
    {
        ErrorMessage = this.ErrorMessage,
        ValidationType = "required"
    };
}
If you run the code again, you will find, that the client side, and the server side validation messages are now localized, using the Umbraco dictionary.
This approach described here, can be used on most of the different attributes, we use in MVC. Happy coding!